Working with Events
On this page
Overview
An event is an incident, project or context of work that groups together and secures all the records, people, positions and audit history associated with that work.
Events allow you to select positions to participate, and choose which registers, resources and assets will be part of the event. When an event has been completed, you can close it and all its related information will be archived. Crisisworks allows multiple simultaneous events to be managed.
Examples of events include “Flood Feb 2017”, “Wind Storm Sept 2016”, “Compliance Inspections”, ”Weed Treatments”, "After-hours call outs”, “Single house fires", "Risk Assessment 2015".
Selecting an event
The event selector is located at the top right of screen, and it allows users to switch between their participating events, or join a new event if there's a new event not listed.
Working in a single event
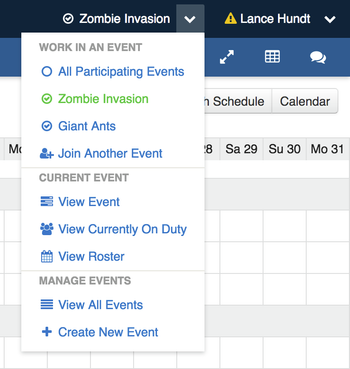
The event selector displays the name of the currently selected event. Clicking the event's name will show detailed information on the event including current users, positions and in-use resources. Clicking the down arrow opens the menu and shows a list of all participating events, where users can select:
- A specific event — to select that event and begin working within it
- All Participating Events — (if available) to view records across all participating events
- Join Another Event — to join an event not listed
Administrators and coordinators will get additional options (shown below) to manage the current event, manage all events, and even create a new event.
All Participating Events mode is useful for viewing records across multiple events at once, but it is not possible to add records, nor assign records to users or positions, when in this mode. Users are recommended to select a specific event and work within it as much as possible.
Joining other events
If an event exists that is not displayed in the user's event selector, the user can click Join Another Event to go to their Manage Duties screen where they join new events by going on duty for the first time.
See Managing Your Duty Status for more information.
Automatically put on call users on duty for an event.
This event setting can be enabled for existing events or chosen on the second page of the event creation wizard.
By enabling the checkbox labelled "Automatically put on-call users on duty" this will place users on duty in the event in the matching positions if the user is "On Call".

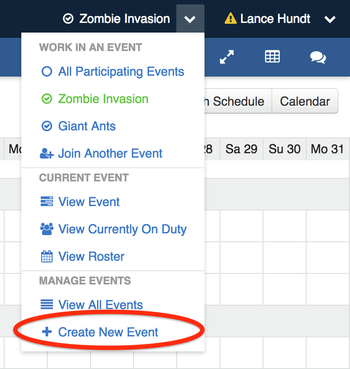
Creating an event
Authorised users can quickly create an event by selecting Create New Event from the event selector.
The event creation process follows a wizard process:
- Provide basic details and click Next
- Confirm details
- If configuring advanced options, customise
- Registers included in the event
- Positions included in the event
- Click Finish
Step 1: Configure basic event details
For most events, the basic events are all you'll need to configure.
Fill in the following fields then press Next.
| Event Title | Describe the event with a short name |
|---|---|
| Title Format | Customise the title with common formats — for example, automatically add the month and year to the event |
| Start Date/Time | This is pre-filled, but you can back-date or forward date an event. If forward dating an event, it will automatically set its status to Open at that time. |
| End Date/Time | The date it typically left blank for emergency events and incidents. For events that represent fixed shifts, this allows the event to automatically have its status set to Closed at the end date/time. |
| Code | A short code, if required, to facilitate data sharing between sites and systems. Leave blank if unused by your organisation. |
| Event Description | A short description of the event. This is not a detailed description, which is better left to an Information record within the event, but is used when reviewing events in aggregate at a later time. |
| Template | Select a template that best suits your event. Templates pre-select the positions, registers and resources, and pre-create key requests, information and other data to kick-start events. You can create your own templates. |
| Event Status | Set to Open (default), or if your organisation has customised this list, select the status most appropriate to the event. |
| Category | By default the category list contains an event risk level, but this can be customised per site so your site may have different categories. Note that the Test Only category is useful for tests and drills, as all communication from the system will be labelled clearly with the word ** TEST ** |
Step 2: Confirm details
The system shows a summary of the positions, registers, resources and data to set up when the event is created.
- If you selected a template and the settings are correct, then you can press Finish to create the event straight away.
- If you wish to modify these additional settings, check the checkbox labelled Configure Advanced Options then click Next.
RECOMMENDED If the event contains one or more positions that you are competent to fill, then you can check the checkbox labelled Automatically put you on duty, and after the event is created, the system will put you on duty for the event and switch you to that event automatically.
If you wish to place on-call users on duty to their positions in this event, check the checkbox labelled Automatically put on-call users on duty.
Step 3: Optional Steps
If configuring advanced options, the system will provide three additional screens which will allow you to:
- Select additional registers to add to the event
- Select additional positions to add to the event
These screens are reached in turn, and for each screen, place a check into the checkbox beside the item to add to the event, and click Next to continue to the next screen. The event is created after clicking Next from the positions screen.
After an event has been created
After an event has been created, you would typically:
- Go on duty for the event, if you didn't do so during the event creation process
- Switch to the event by using the event selector
- Add your first Information record with details of the event, and use the announcement feature to let others know that the event was created.
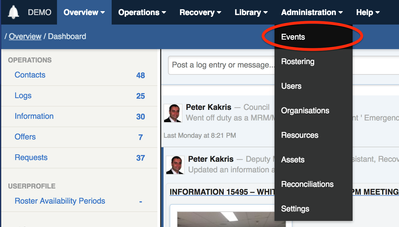
Managing events
COORDINATORS ONLY
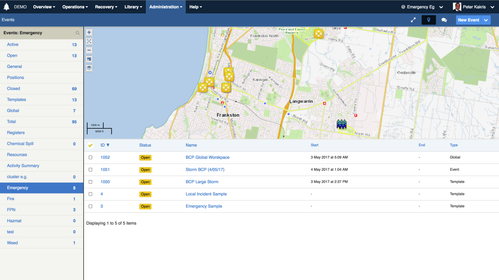
The menu option Administration > Events allows coordinators to view all open and closed events in the system.
These are displayed in a searchable datagrid.
- To navigate the list, click the counters to show just the events for that counter.
- Switch to search mode by clicking the search button (
 ) in the sidebar to expose and use the search filters.
Click an event to view specific details about the event, and to manage the event.
Viewing an event
From the event datagrid, click an event title to view the event summary.
Tip: you can quickly get to this page for the current event by selecting View Event from the event selector.
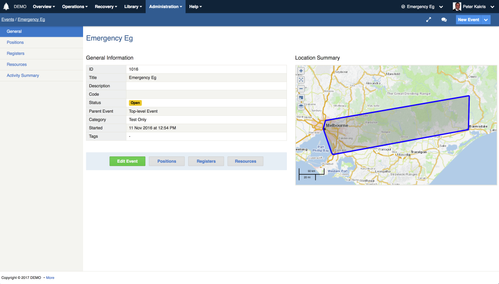
This shows a map summarising all event activity, along with statistics of all the recorded information across all the registers within the system.
Additional views are:
- Positions — a list of positions most recently involved in the event, along with current on duty users for each position.
- Registers — a list of all activated registers, along with a summary count of the number of records
- Resources — a list of resources most recently involved in the event, along with usage statistics
- Activity Summary — the activity feed for the event
These views show summary data only. To view event data, you can:
- Edit the event, set the status to an active status (e.g. Open) and click Save
- Go on duty for the event (in the event selector, select Join Another Event)
- Select the event in the event selector to view its data
Viewing positions in an event
After viewing an event, click Positions to view the positions roster, which shows all active positions along with all the users currently on duty in those positions.
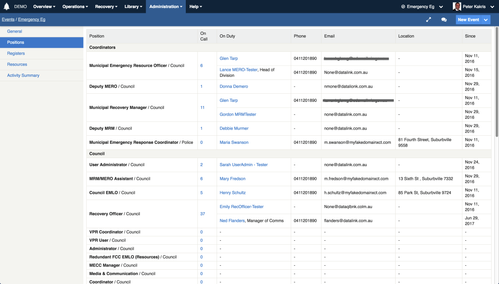
From this screen, authorised users can manage positions by clicking the button labelled Add or Remove Positions at the bottom of the list.

Managing positions in an event
From the positions roster, click Add or Remove Positions at the bottom of the positions listing to manage positions or press the "Edit Positions" button on the event summary screen.
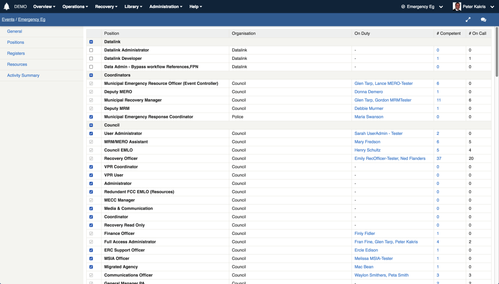
This screen summarises the available positions, and lists any users that are currently on duty for that position. It also lists the number of users that are competent for the position, along with the number of people that are on call for that position.
Adding a position
To add a position to the event, place a check into the checkbox next to the position you wish to add, and then press the Update button at the bottom of the form,
Adding positions to global events is the same as adding them to standard events.
Removing a position
To remove a position, remove the check from the position's checkbox.
The system will not allow positions to be removed if they are currently assigned active records.
Managing resources in an event
From the events resources list, click Add or Remove Resources at the bottom of the positions listing to manage resources, or press the "Edit Resources" button on the event summary screen.
Adding a resource
To add a resource to the event, place a check into the checkbox next to the resource you wish to add, and then press the Update button at the bottom of the form.
Adding resources to global events is the same as adding them to standard events.
NOTE: Global resources are available in all events, so it is unlikely that you will need to add resources a standard event.
Removing a resource
To remove a resource, remove the check from the resource checkbox.
Closing an event
Once an event has been completed you can close the event and add an end date for the event. No further changes can be made to the event once it has been closed.
To close an event:
- Edit the event you wish to close
- Set the status to Closed
- Click Update
When an event is closed, all user participations are marked as complete, users are forced off duty for any event positions that they are working in, and the end date is set into the event if it was not entered manually.
You can re-open an event by changing the status back to Open.
Creating a Global Event
Global events are workspaces that are used to store information to be accessed across multiple events.
More information on global events can be found in Crisisworks Concepts / Using global events to manage permanent information
To create a global event:
- First, create a regular event.
- Now edit the event and check the Global Event checkbox, then re-save the event.
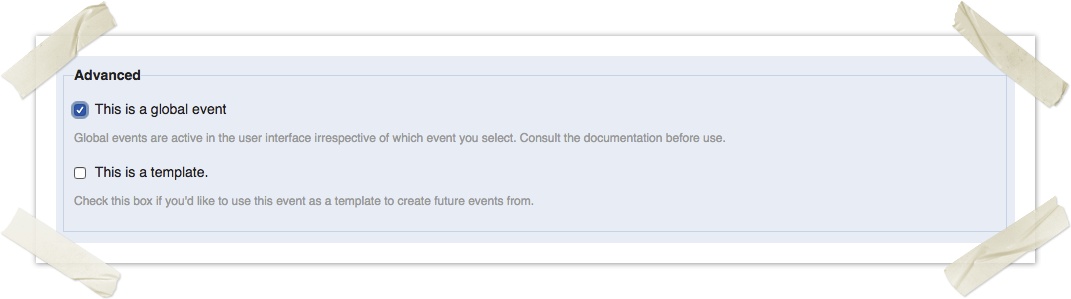
Global events can have two security models, which are accessible via the "Advanced" fieldset:
- Duty Based: users must be on duty in a participating position in order to access the event. This is the normal security model within Crisisworks.
- Policy Based: users only need access to the event's registers via their security policies in order to access event data. This is suited to global access registers such as documentation, where most users should have access even without going on duty to an event.
Creating an Event Template
An event template provides a way to set up a pre-defined configuration of registers, positions, resources and record data to be created when the event is created, and is a great time-saver if you use similar registers, positions and resources for many events, or if you have standard ways to respond to key incidents. Templates save time when adding new events in future as it pre-selects the registers, positions and resources based on the template.
Your site will be configured with some pre-existing templates, but you can create additional event templates.
To create an event template
- Create a normal event and configure it with the positions, resources, registers and instance data you would like created automatically with new events.
- When ready to make the event into a template, edit the event you just created and check the box labelled This is a template
- Click Update
Once an event becomes a template, it can no longer be used like a regular event. Do not select this option for events that are currently in progress as live events.
To edit an event template
- Edit the event and uncheck box labelled This is a template to make it a regular event.
- Now, go on duty to the event and manage the records like a regular event.
- When the event has the records set up the way you like, re-edit the event and re-check the This is a template box to convert it back into a template.