Financial Reconciliation
Overview
Crisisworks provides tools to track costs and reconcile payments after emergencies. You can:
- Add cost estimates against resource assignments, recovery task assignments and damage estimates.
- Import payment data from your finance system and reconcile against Crisisworks data.
- Automatically match imported data based on matching rules, to streamline the reconciliation process
- Run reports to show estimate and actual spend, categories and broken down in ways to help manage cost recovery.
The Financial Reconciliation module is included as part of the Recovery system.
On this page
How to access
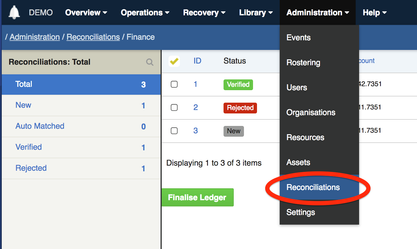
To begin, check that you have the “Finance Officer” security policy applied to your position. You can verify this by viewing your user profile, then clicking View Effective Permissions and checking for “Access to Finance System” (this is done for you if you are using the built-in Finance Officer position). See your administrator if you need this policy applied to your position.
If you have the correct permissions, you should see a Reconciliations menu item under the Administration menu:
Managing Cost Estimates
Cost estimates are managed directly from the edit screen of the item being costed, and only selected Crisisworks record types support adding cost estimates.
For Requests
Requests allow for the addition of resource assignments, via the Resources & Costs fieldset of the Request form.
- To add a new request, click New Request from the New button at the top left of screen
- On the new request form, expand the Resources & Costs fieldset, then click Add New to add a resource assignment
- Enter the resource assignment particulars
- Search for the resource you wish to assign and select it from the list. You can also add a new resource by typing its name.
- Enter the quantity required. The units and unit rate are determined by the resource record and are displayed on screen if set. These can be managed for each resource via Settings > Resources.
- Optionally add a reference, and any other details for the job that aren't present in the request details
- When the resource assignment is completed, you can check the Completed box. This happens automatically when a request is resolved, but is useful to do in the event that an open request has multiple resources assignments and should remain open until all are complete.
- You can add multiple resource assignments against the one request
- Press Save to save the request
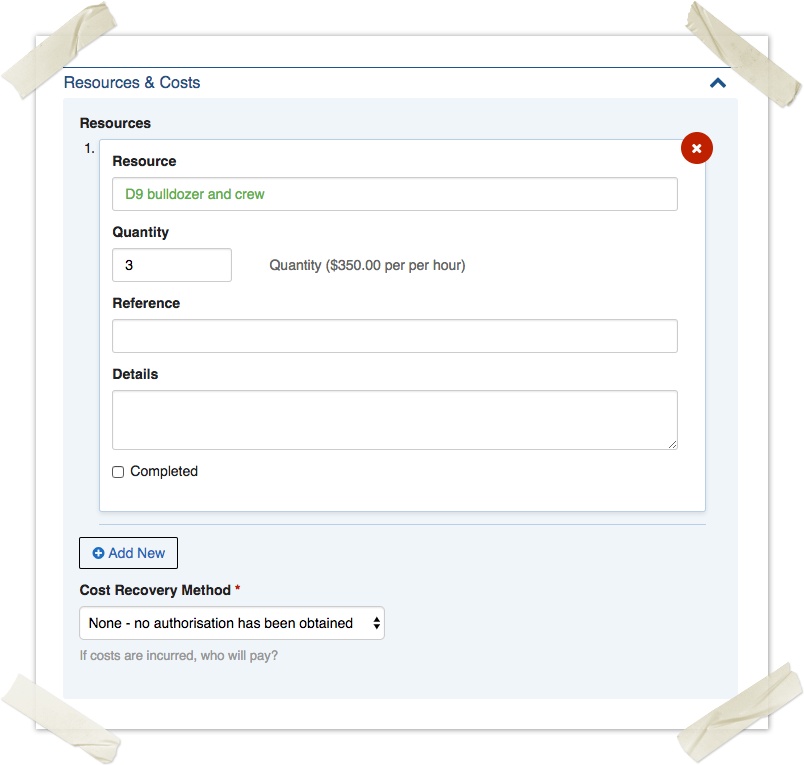
The cost estimate for each resource assignment is automatically calculated based on the quantity x the unit rate, and a total cost for the request is calculated based on the sum of all resource assignments recorded against it. Note that the total cost estimate is not displayed on the request record.
For Infrastructure Assessments & Recovery Cases
Infrastructure Assessments (for asset and infrastructure recovery) and Recovery Cases (for private property and recovery services for residents) support a unified Services and Tasks system, which allows for the tracking of needs & tasks in municipal recovery across all pillars of recovery.
- To add an Infrastructure Assessment or Recovery Case, click New Infrastructure Assessment or New Case from the New button at the top right of screen.
- For Recovery Cases, scroll down to the Services & Tasks fieldset. For Infrastructure Assessments, the scroll down to Service Required.
- Click Add New to add a new service, then enter the particulars of the service
- Select the category of the service (e.g. Repair and Reinstatement, Fencing, etc). These categories are managed in Settings > Internals > Lookups.
- Change the Provisioning Status and Priority if required
- Enter the details of the service required
- Optionally enter a reference such as a purchase order number
- If known, enter a cost estimate
- If you are assigning directly to a service provider, select them here, otherwise this can be done later. Note: Only service providers that are both within the appropriate category (one of Infrastructure Assessment Tasks or Recovery Service Tasks) and are actively involved within the event (via the Events > Manage Resources) will show in this list.
- Multiple services can be added to one case
- Click Save to save the record
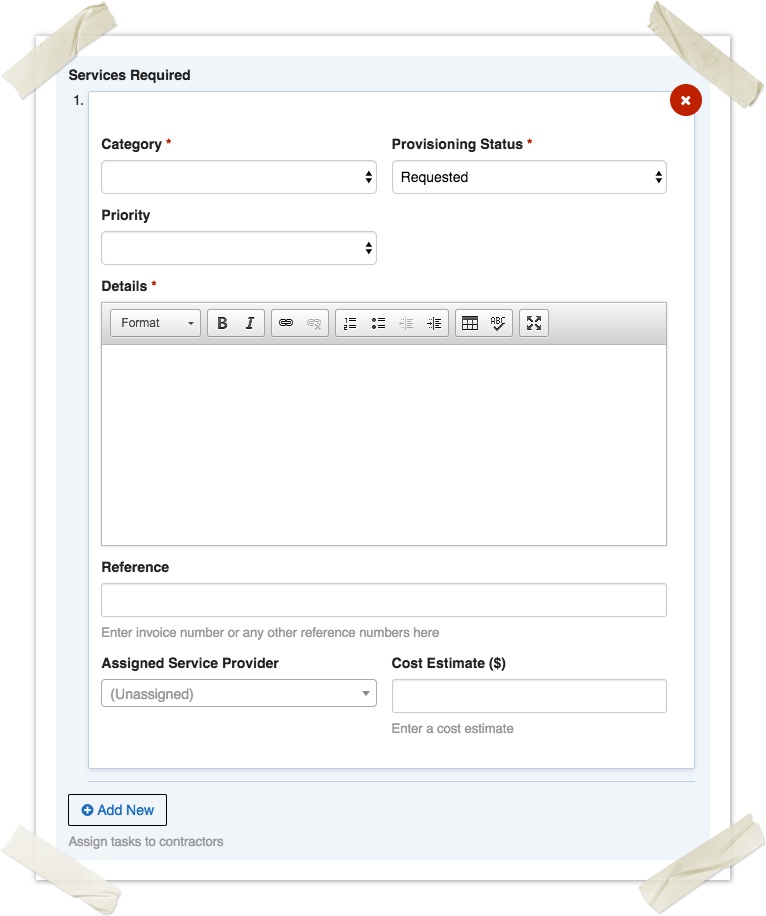
Within this form, each service has its own Cost Estimate field that supports a dollar figure for the estimated cost of the service. Unlike the resource assignment system used in requests, in recovery, services can be specified without nominating a contractor or service provider. This means you can enter a cost estimate ahead of nominating a service provider to do the work.
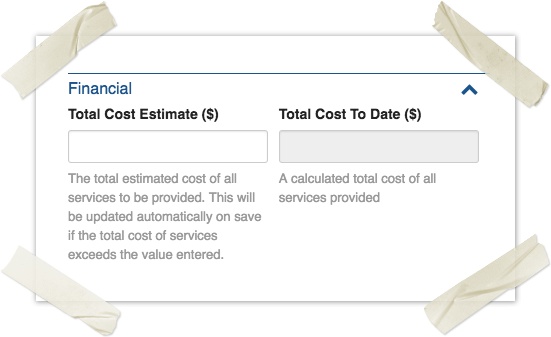
The total of each estimated cost is applied to the parent record's Total Cost Estimate field automatically, but this can also be overridden if a higher value is required. This override allows you to quickly add rough estimates of cost for damages without going to the detail of recording individual recovery tasks. It will be automatically replaced by the sum of the recovery task cost estimates if that value becomes higher.
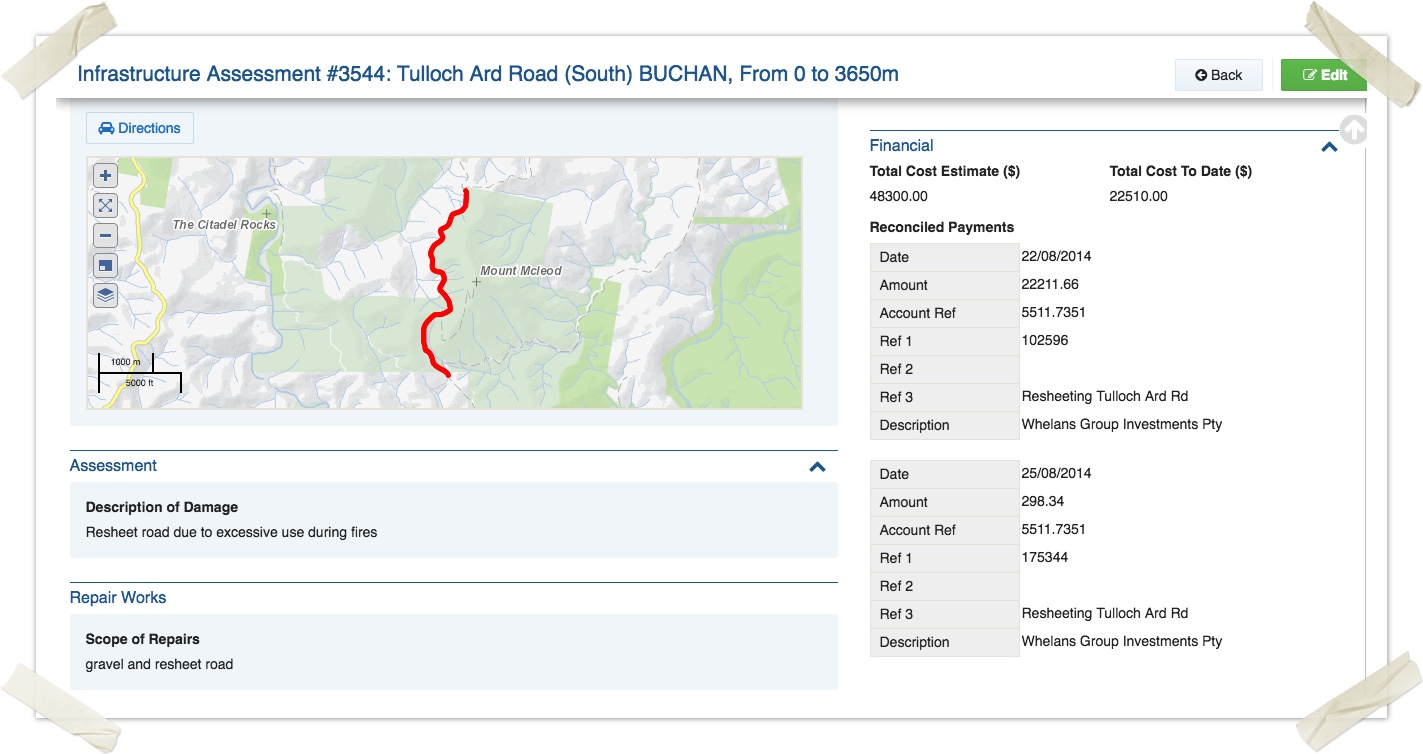
Viewing verified payments for specific records
When viewing a record that has linked and reconciled payments via the finance system, the list of Reconciled Payments will appear in the sidebar.
Importing and Applying Payments
The main purpose of the financial reconciliation system is to provide a way to import and apply payments to the damage infrastructure, recovery cases and requests made during an emergency.
The overall steps are:
- Export a list of payments from your accounting software
- Import the file into Crisisworks
- Reconcile the payment records against Crisisworks records
- Records need to be attached to a Register Item and assigned a category
- Auto-matched records work by matching to asset number or item ID
- Records can alternatively be marked as Rejected, which means Crisisworks ignores the payment
- Finalise the payments when you have finished reconciling the payments
Exporting financial payment data from your accounting system
Each system is different so this section cannot be prescriptive, however in general Crisisworks supports a CSV export where each row is a record of a payment that needs to be reconciled. In practice this is usually the "detail line" level of an approved invoice, rather than the invoice or payment itself. It is up to you whether you work in a cash or accrual perspective.
Crisisworks can support different import schemas to match the outputs of many different systems. Currently it supports two formats:
- Crisisworks Finance CSV Format
- JD Edwards CSV Format
Details can be found at the appendix to this guide.
When exporting, it is typical that you may export and import multiple periods (e.g. perform this process each month on the latest month's data). To support this approach, Crisisworks allows you to name each import so you can avoid overlapping time periods.
Importing payment data from your finance system
To import the file you exported, follow these steps:
- First, log into Crisisworks and select the appropriate event from the top right hand event selector.
- Next, navigate to the Finance Reconciliation system (Finance > Reconciliation in the menu)
- This screen shows a list of all "Reconciliations" (previous imports)
- Click Start a new reconciliation to import a new file
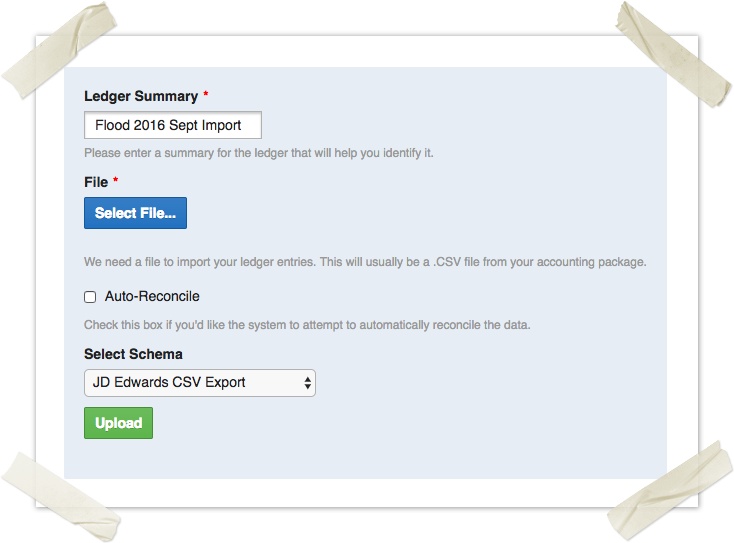
- Next, enter a summary of the import file, upload the file, and select the schema
- Check the "Auto-Reconcile" option if you want Crisisworks to attempt to auto-match the payments to Crisisworks records. This alleviates the manual matching process for invoice data that contains matching asset codes or Crisisworks record IDs.
- Click Upload to begin the process
Once the file has been uploaded, background processing will commence and this can take a few minutes. The Reconciliations data grid will show the current status of the import.
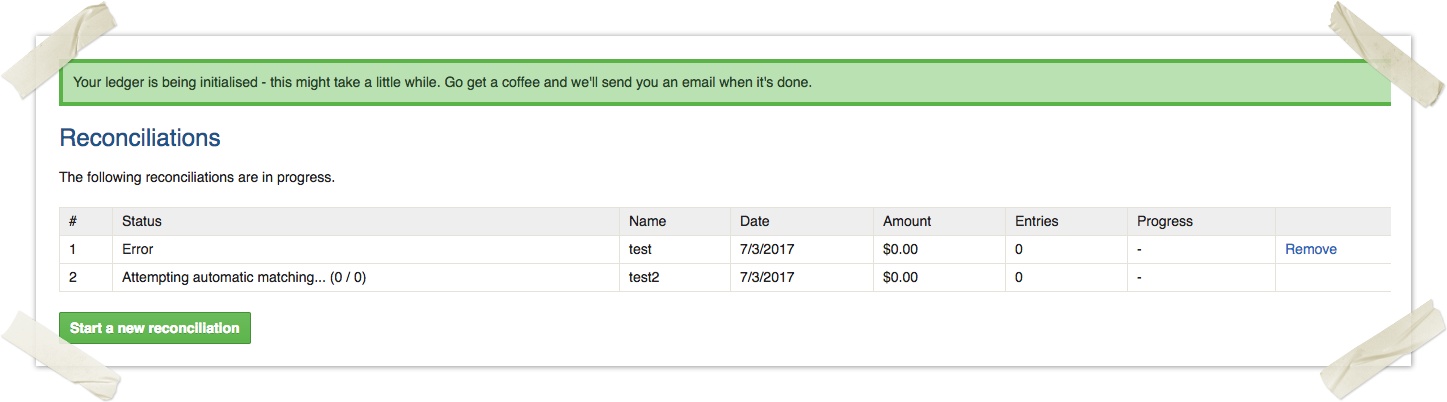
If the imported file contains errors, it will get a status of Error, and you will need to try again.
This process may take up to 15 minutes to complete, during which time you can go on with other work or close your browser window. Check back to this screen periodically until the status says Ready for matching or finalising.
Reconciling payments
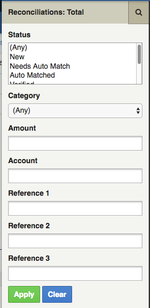
Once the reconciliation file has been processed it will be ready for you to work with, and the status will change to a hyperlink called Ready For matching or finalising. Click that link to commence reconciliation.

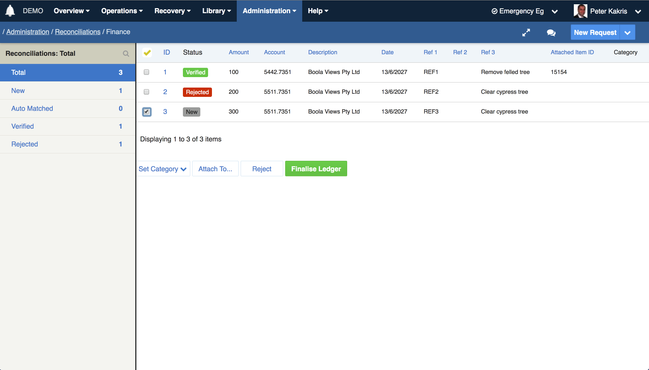
This will then load the reconciliation data grid as follows.
During the reconciliation process all data is in a draft state, and no payments are applied until you finalise the import at the end of the matching process. You can leave this screen at any time and return to it with your current draft saved.
The aim for processing payments is to:
- match each payment to a Crisisworks record, and
- allocate it to a financial category
To match a payment to a Crisisworks record:
- Select one or more payments using the selection checkbox against the record
- Click Attach To... and then enter the Crisisworks record ID you wish to attach these payments. You can do this with multiple payments at once, but the record must be in the correct event being reconciled, and the record must be one of the supported types (Request, Recovery Case or Infrastructure Assessment)
- Tip: use two tabs or browser windows to allow you to search Crisisworks records for their IDs whilst remaining in the reconciliation screen. This also allows you to add new records that may not exist, and then add the resulting record ID directly to the payment record.
To set a category:
- Select one or more payments using the selection checkbox against the record
- Click Set Category, then select one of the categories (Emergency, Non-Emergency). These categories exist to assist with NDRRA claims.
If payment records appear that should not be matched, you can reject them and Crisisworks will not apply them during the finalise step.
- Select one or more payments using the selection checkbox against the record
- Click Reject
- Tip: If you later want to unreject the payment, simply match it and it will be automatically unrejected.
The counters on the side keep track of how you are going:
| Counter | Description | Payment will be applied when finalised |
|---|---|---|
| Total | The total number of payments in the import file | - |
| New | The number of unprocessed payments — these need matching | No |
| Auto Matched | The number of payments successfully auto-matched by Crisisworks during the import. You can inspect these and leave them as-is, or you can override individual matches. | Yes |
| Verified | The number of payments you have manually matched. | Yes |
| Rejected | The number of payments to be ignored during this import | No |
At the top of the counters sidebar is a magnifying glass, which takes the user to a search interface where the user can search payment data by its data.
Finalising your reconciliation
Once you have matched or rejected all payments, you can proceed to finalise the payments. Finalising writes the payments against the Crisisworks records, and allows that data to be accessed via the reporting system.
Although there is no undo feature, Crisisworks will sanity-check your payments to ensure that all payments are allocated to compatible records, that the records are within the correct event and that you have set valid categories to each payment. It will also not allow you to proceed if you have any payments in the New status.
To finalise your import, click Finalise Ledger from the Reconciliation data grid. The system will prompt you to type the word 'Yes' to confirm the reconciliation is complete. Once this is done, the finalisation process will commence in the background. It may take up to 15 minutes to process, and during this time you can safely close off your browser to perform other work. Check the status of the work via the status column of the Reconciliations screen.
Once the reconciliation is complete, you can no longer remove the reconciliation file, and the payments will appear for the supported records, and in reports.
Aborting a reconciliation
At any time during a reconciliation you can click Remove from the reconciliations data grid to remove the reconciliation file and start again.
Reporting
A number of report are available to view the payments in context with the emergency.
To access the reports, click Overview > Reports > Recovery Reports
| Report | Description | |
|---|---|---|
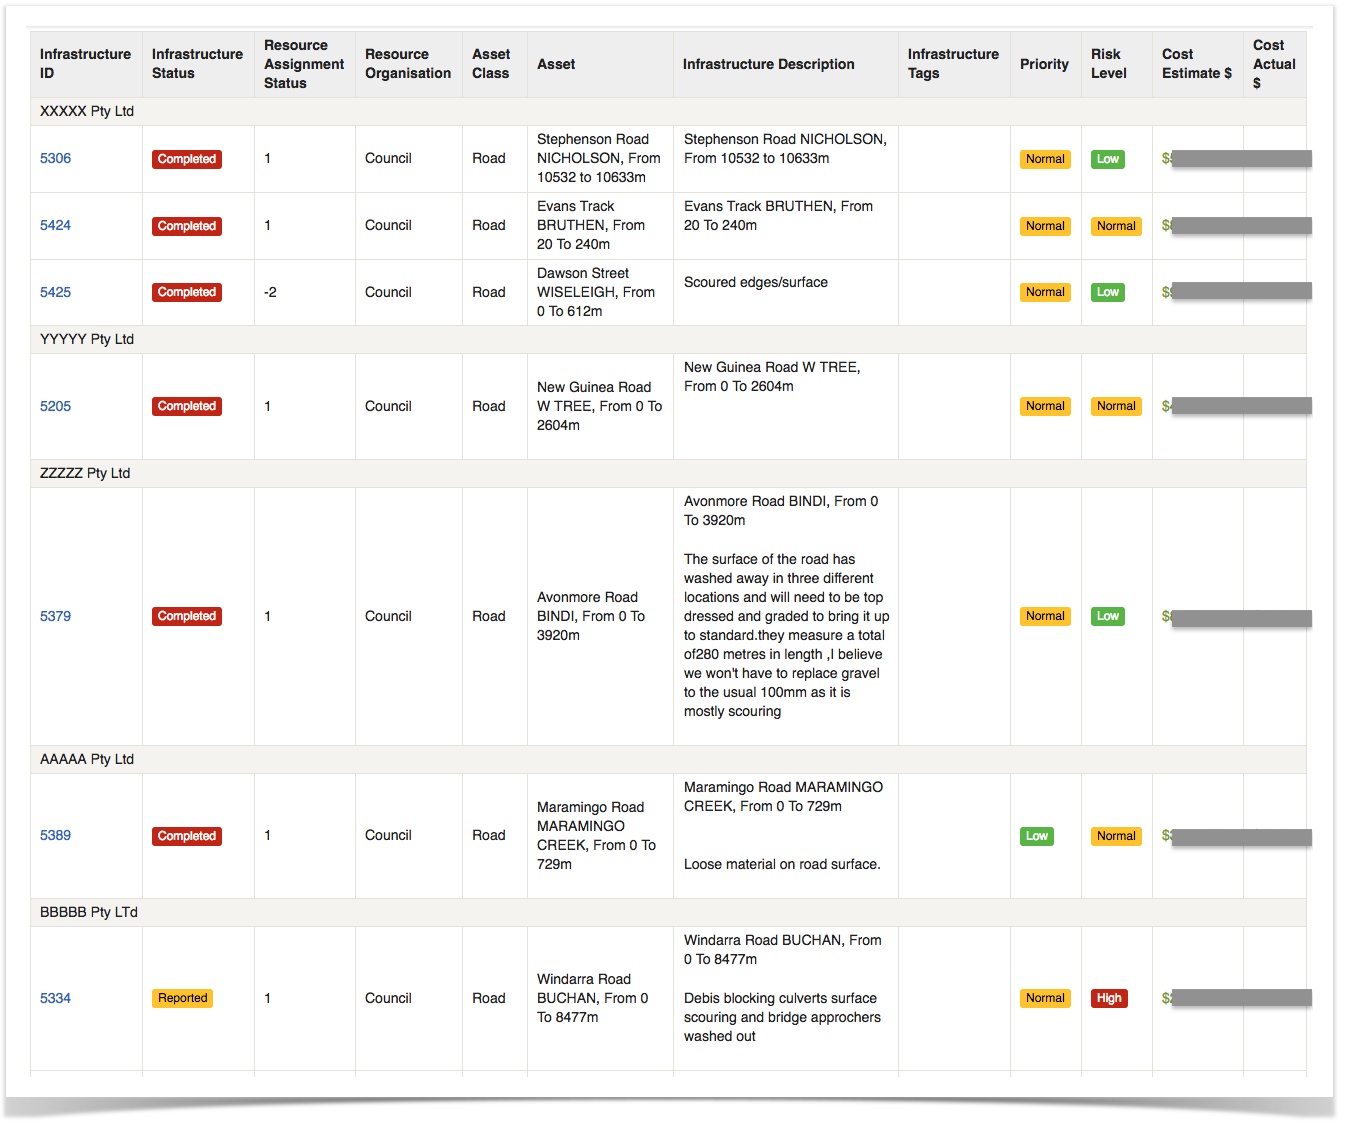
| Finance - Recovery Cost Per Asset Class Summary | A report summarising costs per asset class. Please note - these costs are derived from Infrastructure Assessments only.
| |
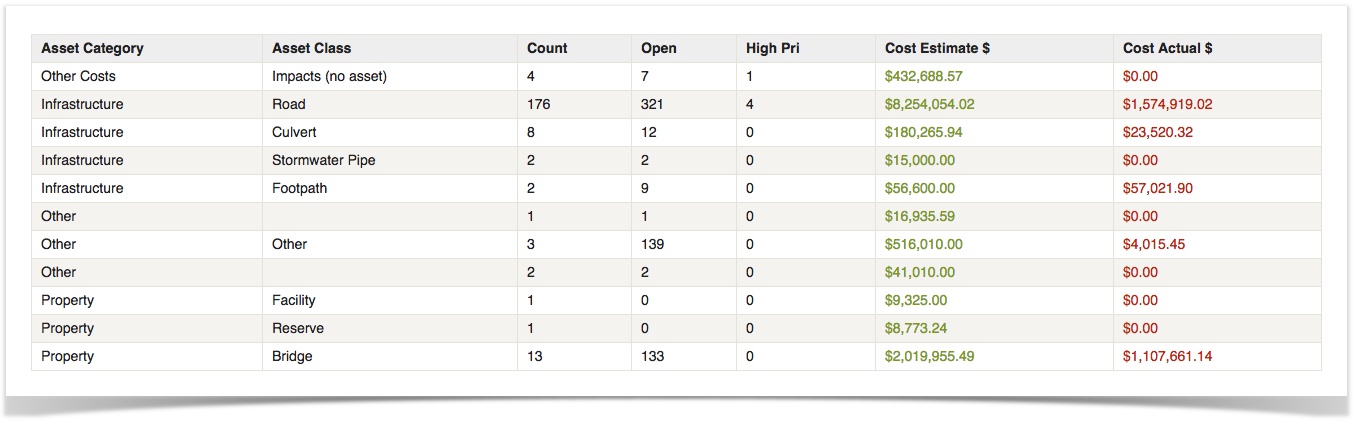
| Finance - Recovery Cost Per Asset Summary | A report summarising costs per asset. Please note - these costs are derived from Infrastructure Assessments only. The actual cost is derived from the Finance Module.
| |
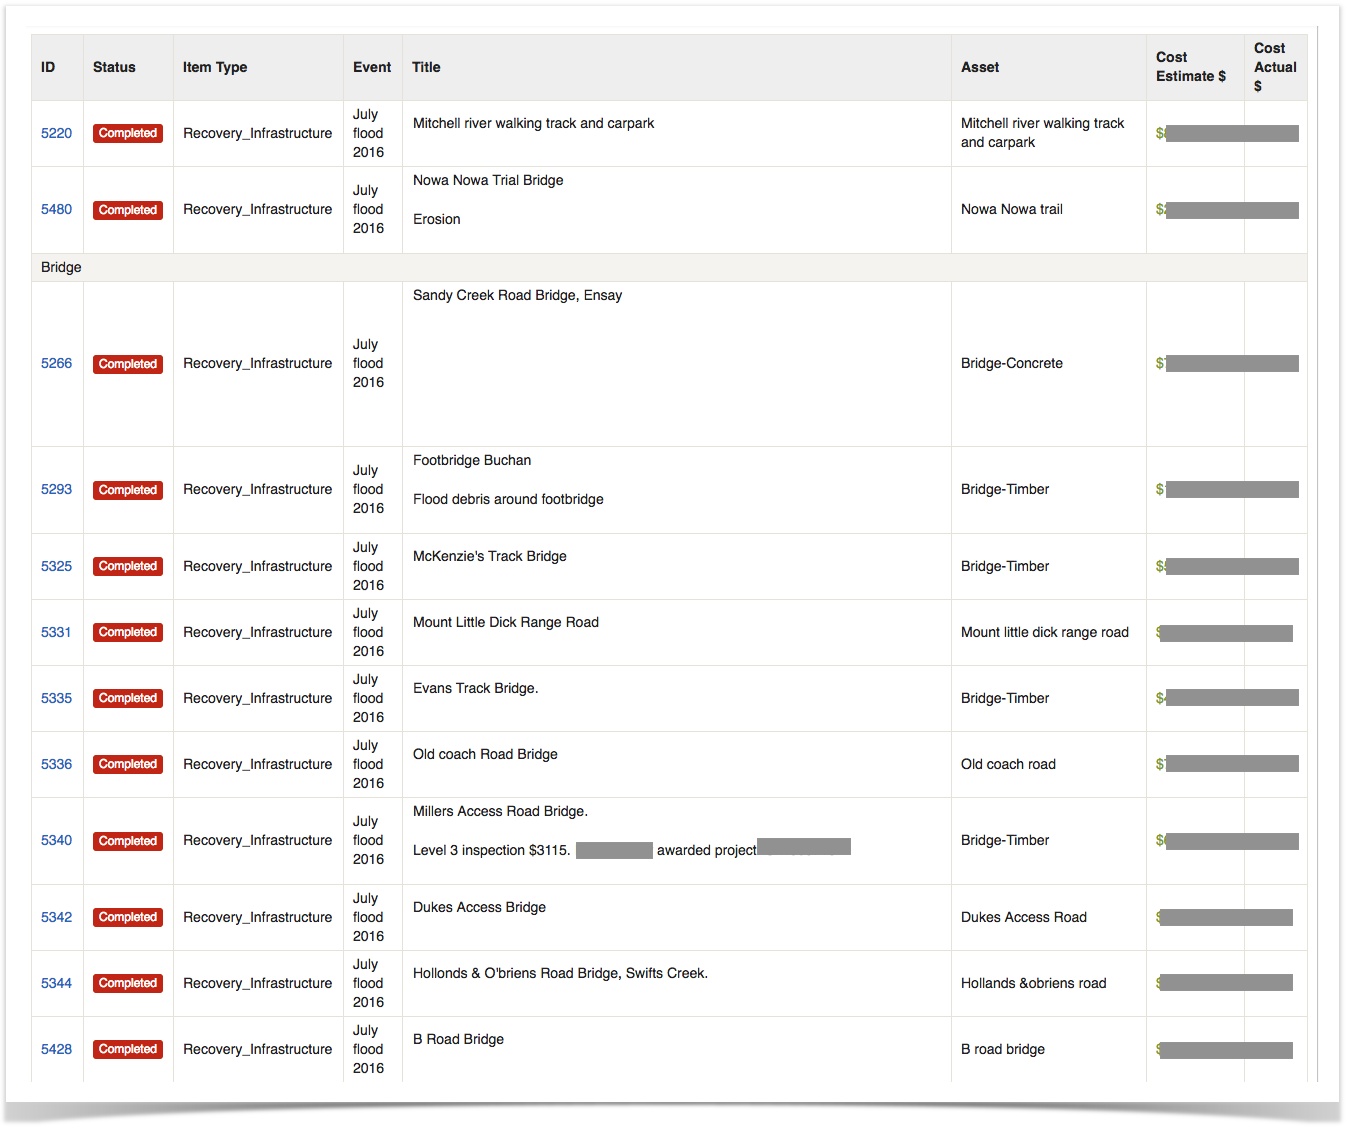
| Finance - Recovery Cost Per Infrastructure Resource Assignment | A report detailing the costs per resource assignment for Infrastructure Assessments. The actual cost is derived from the Finance Module. |
Running a report
- Navigate to the report you wish to run (Overview > Reports)
- Click Generate Report to generate a new report (or you can load previously-generated reports via the Snapshots menu item on the left-hand side)
- Select the event to report upon
- Configure the additional optional filters as required
- Select and deselect the columns as required for the output
- You can group by a particular column, and then order by another column.
- Click Run Report to execute the report
Report Snapshots
Reports can take a few minutes to complete, during which time you are safe to close the browser or navigate to other screens. If you do remain on the page, the completed report will automatically appear once it has generated. If you decided to come back later, the completed report will be available from the Snapshots menu item on the home page of the report.
Downloading as a Excel spreadsheet
Once viewing the completed report snapshot, you can view and print as-is, and you can also generate and download the data in an Excel spreadsheet. To do this, scroll to the bottom of the report to find the buttons.
Appendices
Import file formats
Crisisworks CSV
CSV Heading | Description |
|---|---|
- | A unique identifier for the record |
amount | The value of the payment |
accountRef | The posting account |
lookup1 | Used for automatically matching data. This is configured onto lookup1 to work with auto-matching rule 1, which allows auto-matching for contractors that quote asset numbers. |
| lookup2 | A Crisisworks Item ID (e.g. Request ID). This is mapped to lookup2 to work with auto-matching rule 2, which allows auto-matching for contractors that quote Crisisworks record IDs. |
description | A descriptive text for the payment |
paymentDate | The date of payment |
paymentRef1 | A reference field for matching/filtering |
paymentRef2 | A reference field for matching/filtering |
paymentRef3 | A reference field for matching/filtering |
JD Edwards CSV
| Internal ID | CSV Heading | Description |
|---|---|---|
| id | - | A unique identifier for the record |
| amount | LT 1 Amount | The value of the payment |
| accountRef | Account Number | The posting account |
| lookup1 | Asset Number | Used for automatically matching data. This is configured onto lookup1 to work with auto-matching rule 1, which allows auto-matching for contractors that quote asset numbers. |
| lookup2 | Item ID | A Crisisworks Item ID (e.g. Request ID). This is mapped to lookup2 to work with auto-matching rule 2, which allows auto-matching for contractors that quote Crisisworks record IDs. |
| description | Explanation | A descriptive text for the payment |
| paymentDate | Batch Date | The date of payment |
| paymentRef1 | Sub-Ledger | A reference field for matching/filtering |
| paymentRef2 | Asset Number | A reference field for matching/filtering |
| paymentRef3 | Explanation | A reference field for matching/filtering |
Auto-matching rules
The following built-in auto-matching rules are included by default.
| # | Finance Ledger Item Table | Matches to | Comments |
|---|---|---|---|
| 1 | lookup1 | Asset.code | If the payment record contains an asset code in this field, Crisisworks will look for any matching records that are related to that asset. If any are found, the first record is auto-matched to this payment. This allows your contractors to quote the road's asset number to auto-allocate it to the damaged road in Crisisworks. There is typically only one impact assessment record per asset per event, which makes this a reliable method for working with contractors, especially if they already know the asset numbers as part of their daily work. |
| 2 | lookup2 | Register_Item.id | If the payment record contains an ID in this field, Crisisworks will look for any Crisisworks records in the current event with that ID. If it exists, it will be auto-matched. This rule allows contractors to quote the Impact Assessment, Request or Recovery Case ID in their invoice to auto-allocate their payment to that record. |
Additional auto-matching rules can be configured as required for customers with specialised requirements — contact our service desk for details.