On this page
Overview
The Library is where documents and wikis are securely stored for access all year round and during emergencies. Library records can be for a specific event, or accessible across all events.
Store procedures, policies, job descriptions, minutes of meetings, plans, references guides, and anything else that you need to share with your users.
Library items are known as documents, and can be one of the following schemas. You will have the option of choosing what type of document you are creating when you add a new Library Document.
| Name | Summary of use |
|---|---|
| Document | This is the most general library schema, and most commonly used for general documentation and information sharing. |
| Geospatial Feature | A flexible information storage record with geospatial (map-based) information, which allows storage of data such as affected area extents, location of key facilities, etc. |
| Meeting | An agenda and minutes of a meeting, including audio recording and attachments such as photos of whiteboards. |
Enterprise customers: you may have additional schemas as part of your custom deployment. Consult your enterprise solution guide for details.
Usage
To access the library, navigate to Library from the top menu.
All Crisisworks items are saved into events, and items are normally archived when the event is closed.
When working with the library, you may prefer to have standing documentation which is accessible across all events (including future events).
To do this, you can save them into a global event rather than a specific event. Learn more about Global Events.
Viewing documentation
To view documentation in the library, use the datagrid.
The datagrid combines all documentation from the current event with documents from all accessible global events, to give you a single place to view all documentation.
Counters on the side allow for quick filtering of documentation by each event, as well as by type and by tag. To search the library, click the search icon () above the counters to reveal the search form.
Adding a new library document
To add a library document:
- From any screen, click the New Library Document button. If you wish to change the schema from the default Document type, select this now — available alternatives include Geospatial Feature and Meeting
- Enter the Title and Body of the document as needed.
- Upload any Attachments by dragging and dropping files from your computer into the attachment box, or by clicking Add File.
- Optionally add some Tags to identify the document, and set Is Featured to add the document to the Featured counter.
- Select the Event to save the document. By default this will be the currently-selected event at the top right of the screen, however, you may wish to save the document into a global event instead, if the document is to be permanently accessible.
- Click save to save the document.
The library record will then appear in the datagrid, you can then use the counters to filter the list.
Editing a document
To edit an existing document:
- Browse to Library to view the library Datagrid.
- Use the counters or search system to view the available documents
- Click the link in the datagrid to view the document
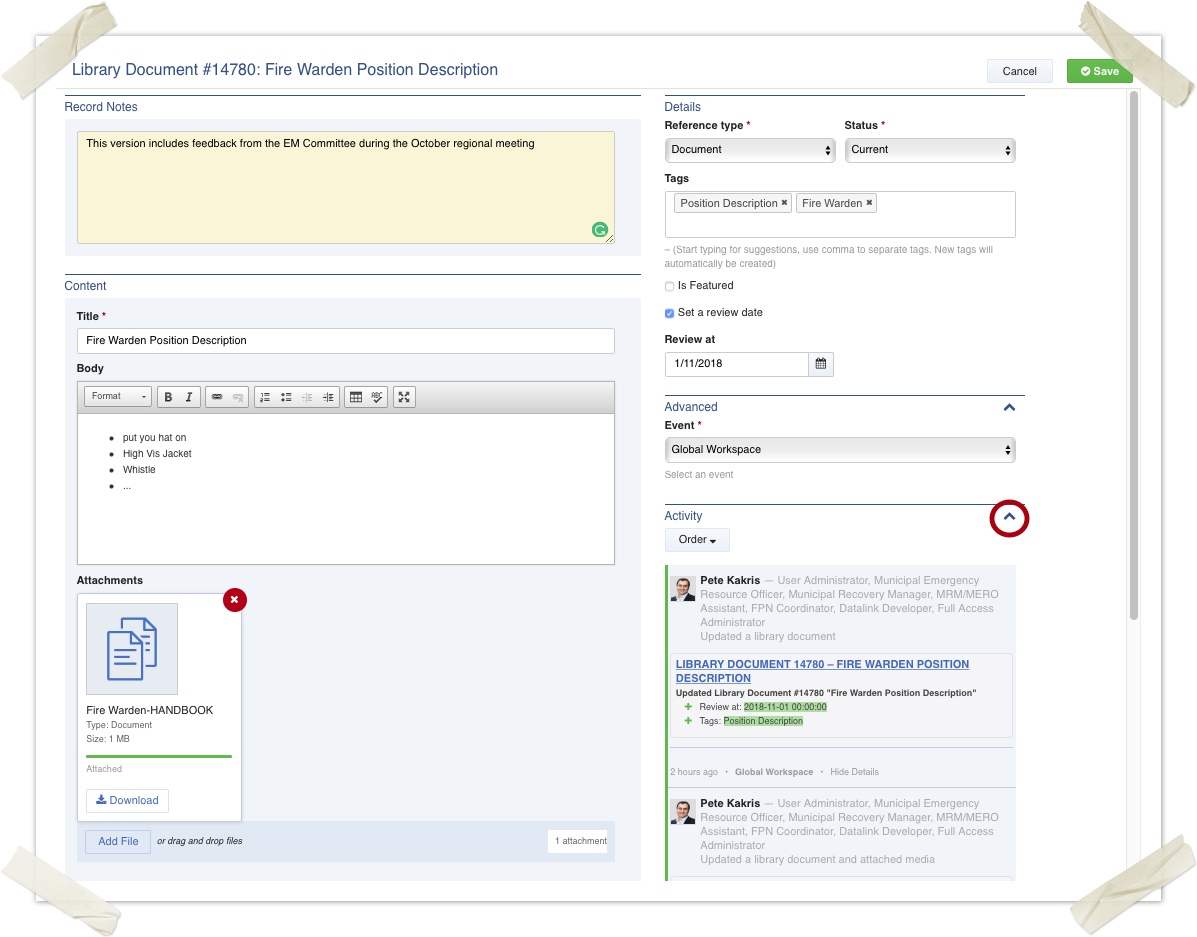
- Click Edit (if available based on your security) to edit the record
You cannot change the type field when editing a record. The form works the same as adding new records otherwise. You can expand to full-screen mode by pressing the expand icon in the rich text area.
The yellow Record Notes textbox is used for general notes which are are not core details for the library record its self, e.g. 'This version includes feedback from the EM committee'. Record notes appear in the audit history.
Tagging documents
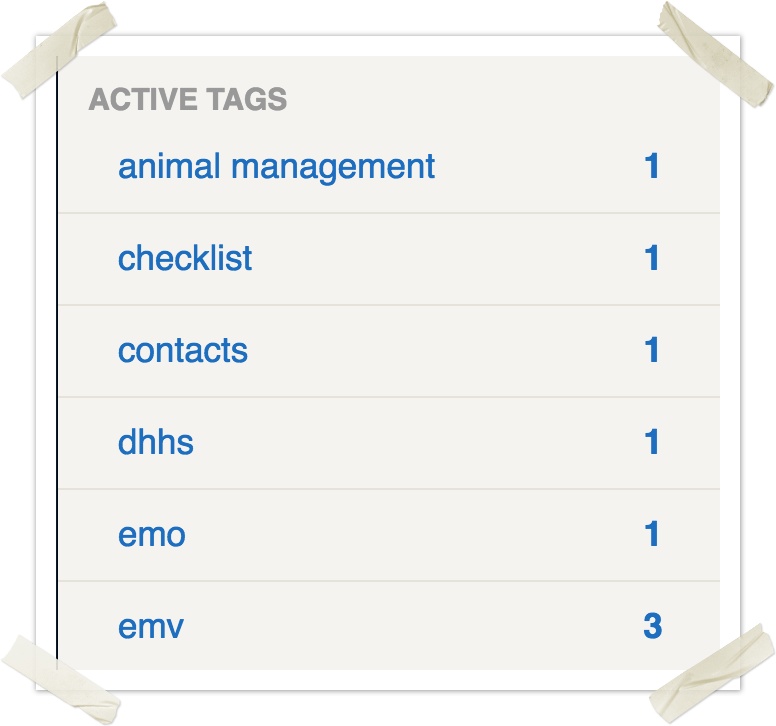
Tags are a great way to file a organise one record into multiple 'folders' at the same time.
The counter indicates how many active records match, and a single click filters the list to show you the items that match the tag.
To add one or more tags:
- Navigate to the Library document
- Edit the record
- Type one or more tag name into the Tags box.
- Previously used tags will appear in a select box — select a tag will auto-complete it.
- Tags can contain spaces
- Add a comma or press Enter as a separator between multiple tags
- Save the record when done
Adding geospatial features
If adding a Geospatial Feature, then a map will additionally appear on the edit form. You can add map annotations by following the instructions on the Working with Maps and Assets page.
Deleting a document
It is not possible to directly delete a document, however you may move the document to an archive event to completely remove it from view.
Geospatial Features
By using the Geospatial Feature schema, you can add map-based reference items.
These items will appear on any map within the system, can be searched and linked from the request registers (as well as all other registers that support asset linking), and support a revalidation workflow to ensure the contents remain current.
Geospatial Category
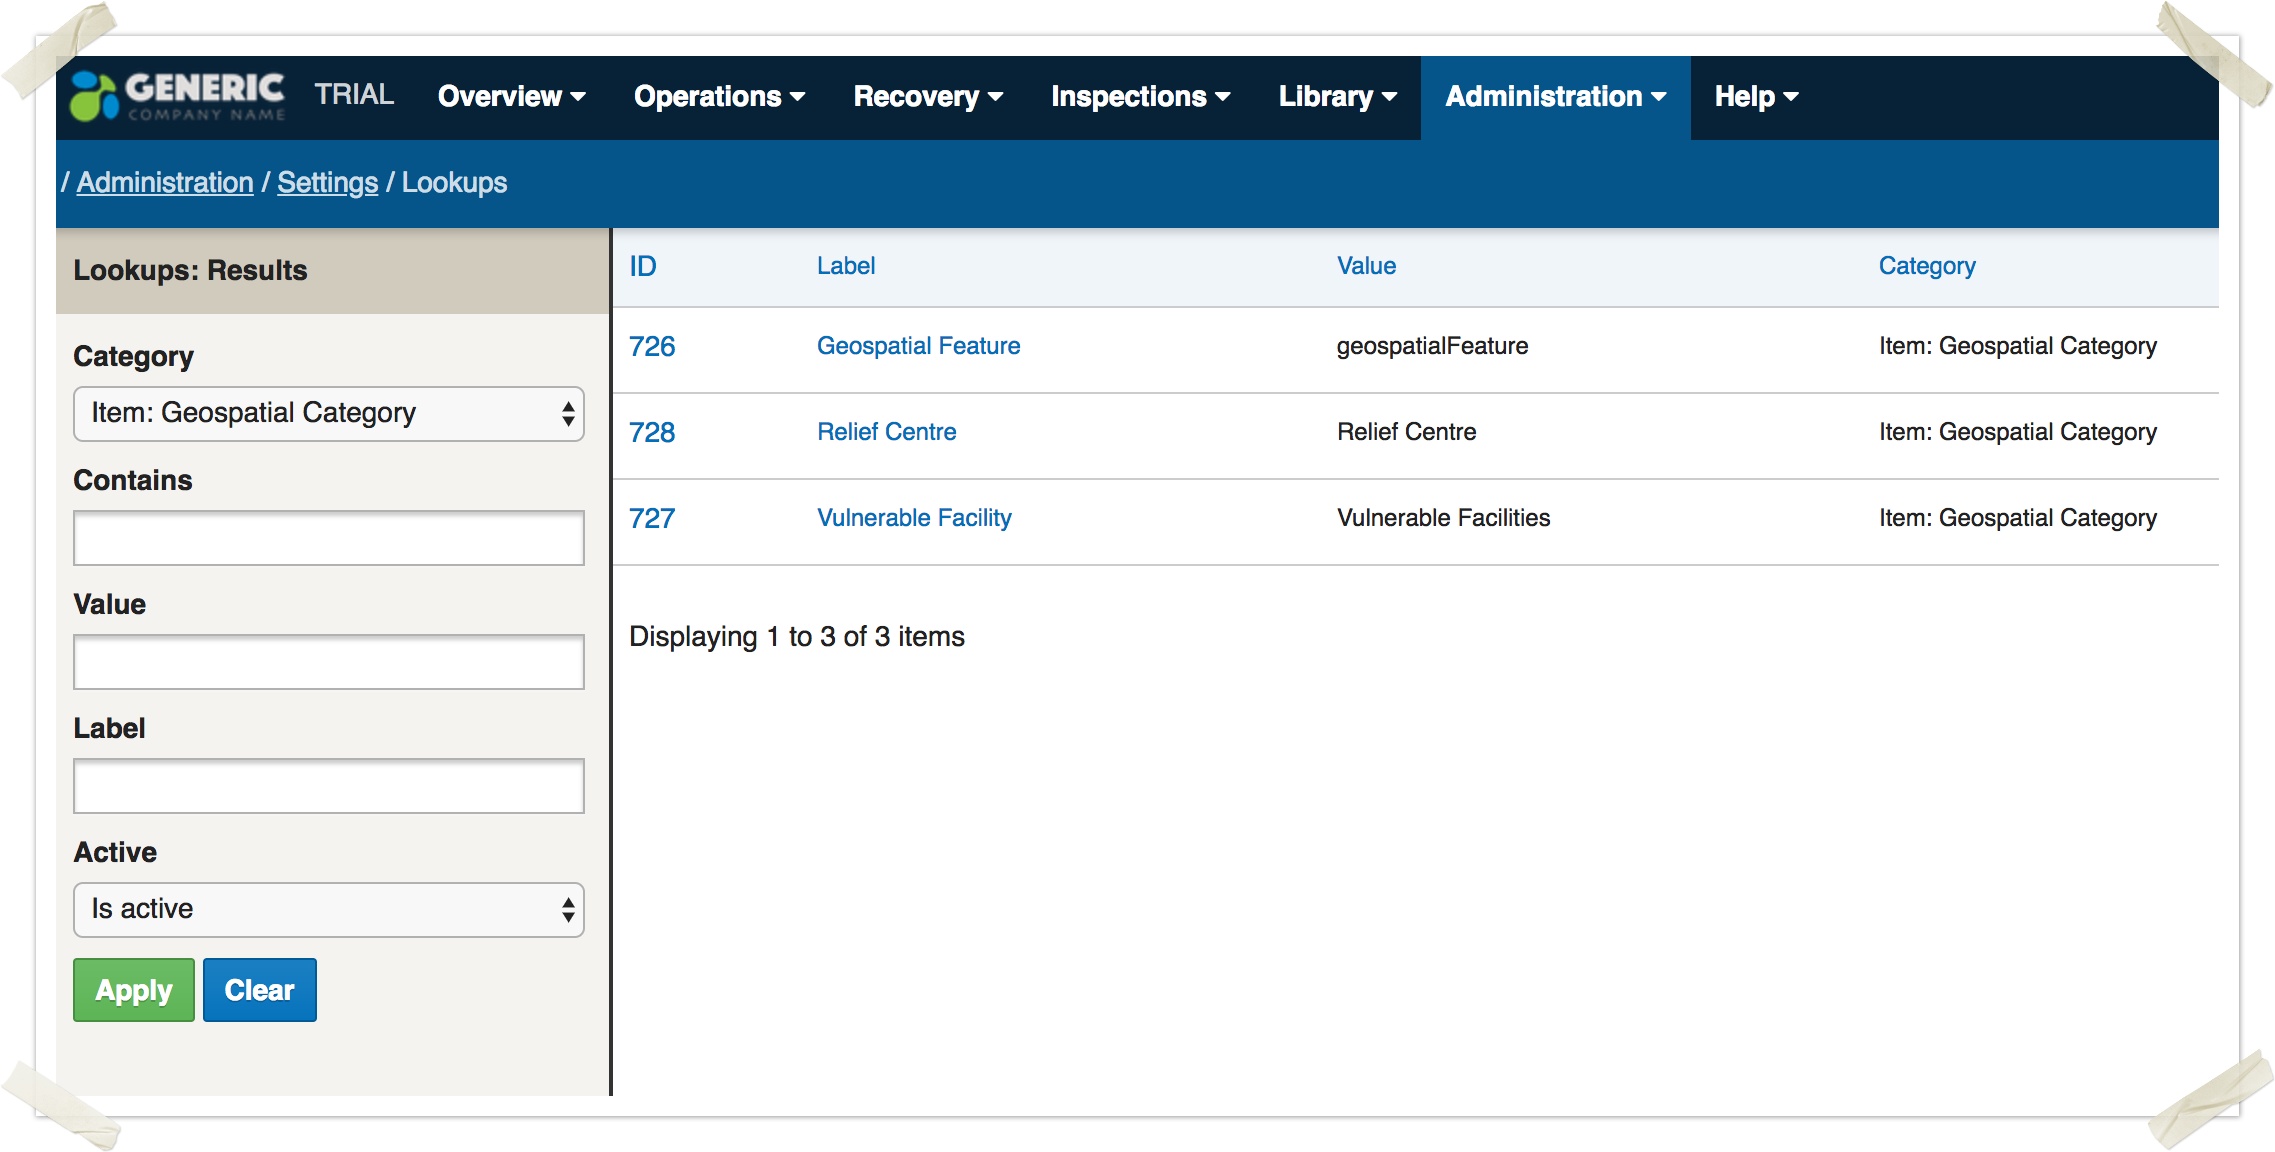
Geospatial categories can be defined by system administrators to support any number of categories. Examples may be "Road Block", "Vulnerable Facility", "Initial Impact Assessment", etc.
To manage the list of geospatial categories, administrators can:
- Navigate to Administration > Settings from the top menu
- Next, navigate to Lookups
- To view the list of geospatial lookups, click the search icon and filter for "Item: Geospatial Category"
- To add a new item, click New Lookup, select the category of "Item: Geospatial Category", then enter the name in the "name" field and a code in the "value" field and press Save.
When adding or changing categories, your users may need to refresh their form definitions (from the user profile menu within Crisisworks) to see the new settings.
Adding Geospatial Features
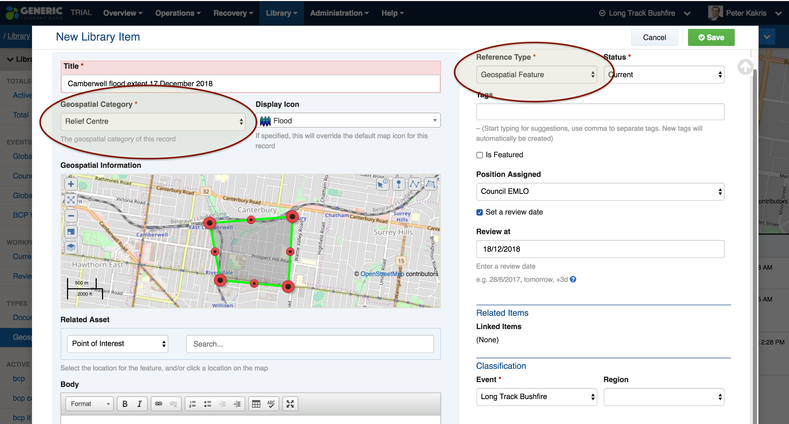
When adding geospatial features into the library:
- First select Geospatial Feature from the Reference Type option
- Enter the title of the feature
- Select the Geospatial Category (this list can be managed via the "lookup" system within Crisisworks)
- Optionally select a Display Icon (tip: search for a keyword within the select box to filter the list).
- Draw the map annotation by using the controls at the top right corner of the map — you can place points, draw a line string or draw a polygon.
- You can also search Related Asset and points of interest, to link the geospatial feature to existing features. This is useful if you are adding a feature that exists at a property address, for example. If the linked asset is also mapped, that map information will be transferred onto this geospatial feature record when it is saved.
- Add information as desired into the Body field, and tag the record as desired using the Tags field
The record can be assigned to a position for ongoing record maintenance, a review date can be set, and the item can be stored in either a current event or a global event.
Geospatial imports
You can now import the geospatial data into a reference item, and this can then be made available as a linked asset (for relating records such as requests or cases to custom areas), a search index (to manage records within or not within the area), and a layer (for overlaying over maps).
For more accurate geospatial data you can import a file or paste the geospatial data into the record choosing one of the two option at the bottom of the form
The system reads many common geospatial format including WKT, GeoJSON, KML, GPX and GeoRSS.
Working Example: how to add a postcode as a geospatial area.
We will step through adding a postcode getting the data from: http://mapit.openlocal.org.au
Once this has been added we will be able to search within this area using the advanced search feature option "within:" and we will also be able to view it on the map as a map layer.
- Go to the library
- Set the "Reference Type" to be "Geospatial Feature" (top RHS)
- Set a useful Title such as "Preston area 3072", and maybe add some tags like postcode,
- Choose a Geospatial Category, you can use one of the defaults such as "Area of Interest" or you could define your own via administration → settings → lookups
- Instead of trying to draw the area using the map annotation features, we will get the exact details from http://mapit.openlocal.org.au
- Scroll to the bottom of the form to the "Geospatial Data loaders" section and select "Clipboard Data Loader"
- find the geospatial data you are after & paste it into this field (see Step 7 example below on how to get some data)
Up till this point if you save the library record you will have created a normal geospatial record which can be shown on the map under the map layer "Library Item: Area of Interest" and you can also link other records to this library record such as requests or information or infrastructure assessments. The next step will allow us to use this as a search area when doing searches in data grids.
8. Under the search section, select "Include in search"
9. The add a name to use in the "Search Short Reference" area to be used when you do a search such as "3072" or "pc3072" if you don't have spaces in the search name it will make it easier to work with later, but you can use them if you like
10. Save your record
When searching for records within this area add multiple search parameters, as per the documentation for Searching and filtering
for example: priority:[high,urgent] within:pc3072 will find high priority OR ugent records that are only in the 3072 postcode
if there was a space in the search name you would need to add a quote eg: priority:[high,urgent] within:"pc 3072"
Step 7 example:
For each state try the following link
- VIC http://mapit.openlocal.org.au/areas/LVI.html
- QLD http://mapit.openlocal.org.au/areas/LQL.html
- NSW http://mapit.openlocal.org.au/areas/LNS.html
- SA http://mapit.openlocal.org.au/areas/LSA.html
- WA http://mapit.openlocal.org.au/areas/LWA.html
For this example, I will get the pocode data for 3072 by doing the following
- Select the "Darebin" local government from the Victorian area,
- Then select "Overlapping this area" from the "Areas" section on the page
- Then select "pc3072"
- on the next page select "WKT" under the "Geometry" section
Displaying Geospatial Features on maps within Crisisworks
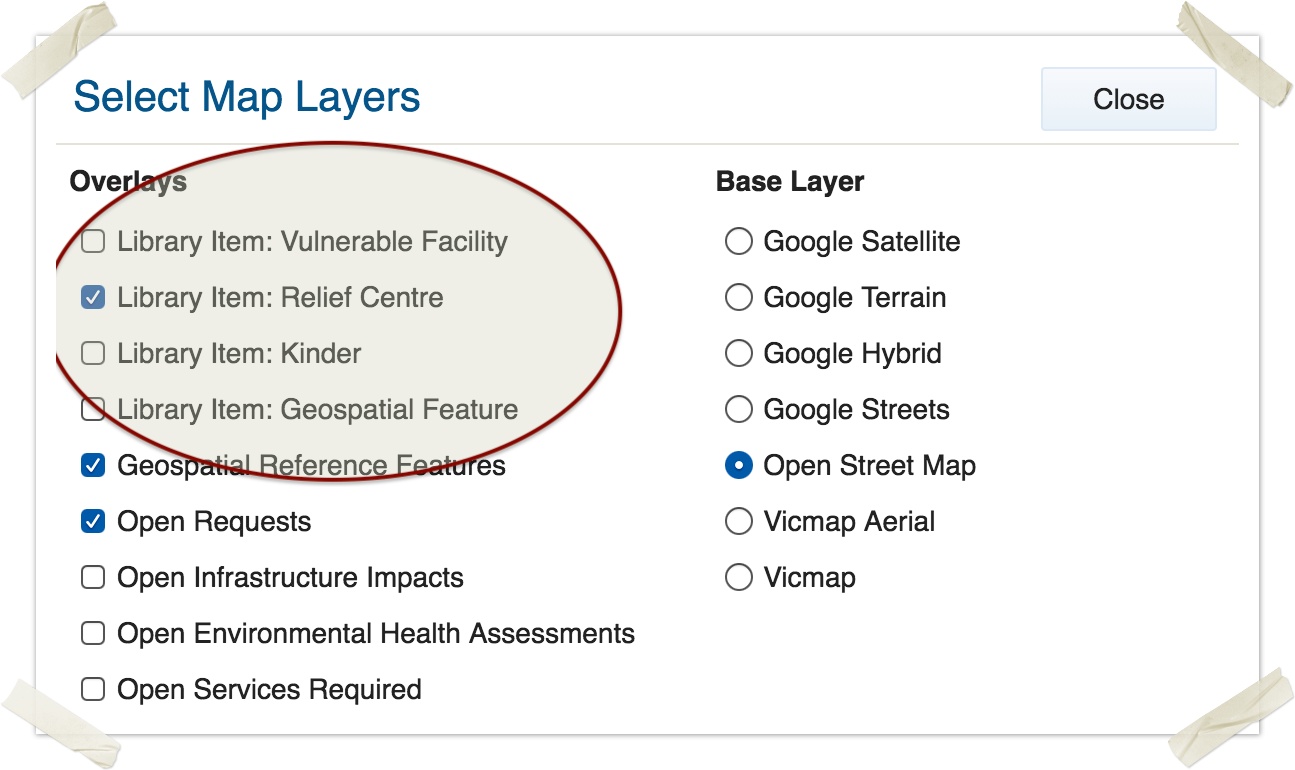
Once a geospatial category has its first feature, a new layer becomes available to all maps to show all the features for that category.
To show a geospatial feature category on a map:
- Click the layer selector icon to the left of any map
- Place a check into the checkbox next to the layer you wish to display
Searching Geospatial Features from other register items
From within requests, information and any other register that supports searching and linking assets, you can search any of the active geospatial reference features in the current event, as well as any global event to which you are authorised.
To find and link a geospatial feature from another item:
- From the asset field, select the Library Item type
- Next, search by name for the item you wish to link, and select it in the result
- The geospatial feature will display on the map
- You can additionally annotate the map with further information for the item being edited.
Workflow
The following workflow applies to library document.
Status
The library document has a simple status code to determine the overall status of the document.
| Status | Usage |
|---|---|
CURRENT | The document contains current information. |
EXPIRED | The document has expired and is no longer current. |
REVIEW | The document should be reviewed for currency. This status is transitioned automatically whenever a review date is set and becomes due. |
DELETED | The library item is marked as deleted and is no longer current. Note there is no way to physically delete items in Crisisworks, however you can move the item to an archive event to remove it completely from view. |
Assignment
Wiki documents can be assigned to positions or users. This assignee is responsible for maintaining accuracy of the information, and will receive notifications whenever items under their control become ready for review.
Review
Users can check the Set a Review Date checkbox, then enter a review date. When that date is reached, the record will automatically be set to the REVIEW status and a notification will be sent to users on duty on the assigned position.
Featured
Users can check the Featured checkbox to include the document in the "Featured" counter.
Technical Reference
Document schema
| Field ID | Label | Form Type | Data Type | Values | Notes |
|---|---|---|---|---|---|
| title | Title | text | string(255) | Required | |
| body | Body | rte | clob | ||
| attachments | Attachments | media | |||
| isFeatured | Is Featured | checkbox | boolean | ||
| assignee | Position Assigned | assignment | Single assignment to Arrays | ||
| setReviewDate | Set a review date | checkbox | boolean | ||
| reviewDate | Review at | stateTransitionDatePicker | timestamp | Only available if ‘setReviewDate:true’ | |
| activity | auditLog |
Geo feature schema
| Field ID | Label | Form Type | Data Type | Values | Notes |
|---|---|---|---|---|---|
| title | Title | text | string(255) | Required | |
| geoCategory | Geospatial Category | select | string(255) | Required; the geospatial category of this record | |
| icon | Display Icon | select | string(255) | If specified, this will override the default map icon for this record | |
| body | Body | rte | clob | ||
| attachments | Attachments | media | |||
| isFeatured | Is Featured | checkbox | boolean | ||
| assignee | Position Assigned | assignment | Single assignment to Arrays | ||
| setReviewDate | Set a review date | checkbox | boolean | ||
| reviewDate | Review at | stateTransitionDatePicker | timestamp | Only available if ‘setReviewDate:true’; enter a review date | |
| syncedAssetItemData | hidden | string(255) | |||
| syncedAssetItems | Linked Items | info | Read only | ||
| activity | auditLog |
Meeting schema
| Field ID | Label | Form Type | Data Type | Values | Notes |
|---|---|---|---|---|---|
| title | Topic | text | string(255) | Required | |
| meetingStartDate | Meeting Start Date and Time | dateTimePicker | timestamp | Required | |
| agenda | Agenda | rte | clob | ||
| attachments | Business Papers | media | |||
| present | Present | textarea | clob | ||
| absent | Absent | textarea | clob | ||
| previousMinutesReview | Review of Previous Minutes | rte | clob | Review the previous minutes and note down any inaccuracies | |
| notes | Meeting Notes | rte | clob | Add discussion topics and notes here | |
| resolutions | Resolutions and Action Items | rte | clob | ||
| nextMeeting | Date and time of next meeting | dateTimePicker | timestamp | ||
| meetingClosedTime | Meeting closed time | dateTimePicker | timestamp | ||
| isFeatured | Is Featured | checkbox | boolean | ||
| assignee | Position Assigned | assignment | Single assignment to Arrays | ||
| setReviewDate | Set a review date | checkbox | boolean | ||
| reviewDate | Review at | stateTransitionDatePicker | timestamp | Only available if ‘setReviewDate:true’; enter a review date | |
| activity | auditLog |
Non-schema fields
| Field ID | Label | Form Type | Data Type | Values | Notes |
|---|---|---|---|---|---|
| hasAsset | Related Asset | asset | Only available if ‘itemSchemaName:geofeature’; select the location for the feature, and/or click a location on the map | ||
| hasEvent | event | ||||
| hasMap | Geospatial Information | geo | Only available if ‘itemSchemaName:geofeature’; uses MDA94 projection | ||
| hasSchemaSelection | Reference Type | schemaselection | |||
| hasStatus | Status | status | |||
| hasTags | tags |
Workflow
| Workflow ID | Label | Value | Next States | Initial State |
|---|---|---|---|---|
| NEW | New | 0 | CURRENT, DRAFT | |
| DRAFT | Draft | 1 | DRAFT, CURRENT, EXPIRED, DELETED | |
| CURRENT | Current | 2 | CURRENT, REVIEW, EXPIRED, DELETED | ✓ |
| REVIEW | Review | 3 | REVIEW, CURRENT, EXPIRED, DELETED | |
| EXPIRED | Expired | –2 | EXPIRED, CURRENT, DRAFT, DELETED | |
| DELETED | Deleted | –3 | DELETED | |
| REOPEN | Reopen | 4 | CURRENT |

