On this page
Overview
Resources have a few different functions in Crisisworks. The primary use for resources is to track costs and usage of items or services. Examples of resources may be subcontractors, vehicles, or services. or costs like "Staff Overtime - Band 1"
Each resource has a history of its usage so you can look at a resource and see everywhere where it has been used and the costs associated. Resource can be pre-created in the settings → resources section by Crisisworks administrators, or ad-hoc resources can be added from requests. The resource data includes the costs and unit of measurement such as $50/hour, $5 per litre , $500 per day or $40 each.
Resources are linked to each event, so it is important that your events templates contains the resources you would like to have so the new events created have the resources needed. Note you can multiple event templates each could have different sets of resources in them, based on the event template. Resources can also be added to an event after it has been created.
Using resources
For the core modules resources are used in Requests, Infrastructure Assessments and in Cases in the services required section. Resources are used to manage contractors in fire prevention notes, Resources are also used in some other customised modules.
Details on how to add an existing resource to a record will be covered in the relevant sections for those register types.
Editing resources
Crisisworks administrators or Resource managers can create and edit resources.
- Select Resources from the settings menu
- Find the resource you want to edit, you can use the tag or category counters, or perform a text search
- You can use the magnifying glass to filter the list. Note you can use wild cards like bob* to search for "bob cat", or "Bob jones Pty Ltd"
- Click on the resource ID or resource title to view the resource
- Press the green Edit Resource Button
- Make the changes needed, then press save
- See the notes about the core fields re costs in the "How create system resources” section below
- Press save
Adding resources
Crisisworks administrators or resource managers can create and edit resources.
To add a new resource there are two options, pre-define them for later use, or create an ad-hoc resource from within a request
How create system resources
- Select Resources from the settings menu
- Before creating a new resource make sure doesn’t already exist, by searching for it
- You can use the magnifying glass to filter the list. Note you can use wild cards like bob* to search for "bob cat", or "Bob jones Pty Ltd”
- Select "New Resource” button on the top RHS of the resource datagrid
- Choose the resource category and type
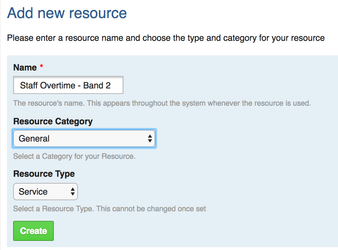
- The category will effect which modules it will be available in, the general category will be available in most registers
- Some resources type like “Fire Prevention Contractors” only appear if you have the extra module licensed.
- The choice of type will effect which fields will be shown on the following screen
- The choices for type are Consumable / Equipment / Service
- After pressing the “New Resource” button on the RHS of the datagrid, fill in the data fields
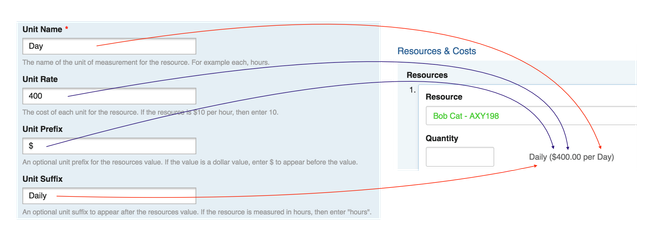
- Many of the fields are obvious however these following fields are the core fields needed to tack costs, this diagram shows how the data fields fields will be presented in the request entry screen.
- After you have created your resource(s) ensure that you add them to your event templates, so they will be copied into new events in the future.
- We recommend that you create all of your resources in bulk so you can add multiple resources to the events at the same time.
How to create an ad-hoc resource
When you are in a request and you wish to use a resource but release the resource has not been created yet, you can create a basic resource from within the request,
- Press the “Add new” button, to add a new resource to the request
- Start typing to search the pre-defined resources, as you type you will see a list of any recourses that match the letters you have entered so far
- If no resources match, you will see the message “A new entry will be created”
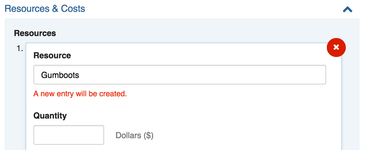
- When this happens it means when you save the request it will create a new resource and it will also add the resource to the current event
- The key difference here is that the unit rate defaults to $1 so you are adding quantities of dollars, so you can just enter the total $ value of the item you which to the the cost of.
- The unit name is also set to “Dollars", the unit Prefix is set to “$”
- If you intend to convert this ad-hoc resource into a proper resource for re-use in the future, we recommend you use the Quantity as the number of items you want, then go and edit the resource and enter in the proper unit cost (see Editing resources section above)
- If no resources match, you will see the message “A new entry will be created”
Adding/changing resources in an event
When using resources, only resources that have already been added to the event can be search for and linked to the records in the event.
The same approach applies to adding resources to event templates as it does for normal events.
Only some positions will have access to edit events, if you do have access please follow these steps to add resources to an event:
- Navigate to the event overview page in one of five ways:
- Press/click on the current name in the menu bar
- Select “Manage current Event” from the active events drop down list
- Select “Manage Events” from the active events drop down list, which shows you a list of events, then select the event you wish to edit
- Select “Manage Event” from the Events menu
- Select “Manage Events” from the Events menu, which shows you a list of events, then select the event you wish to edit
- From the event overview screen press the “Manage Resources” button
- On this next screen select the resource(s) you want to add to the event
- You can bulk add resources by selecting the check box in the a category header row
- Each time you select the check box in the category header row, it will toggle all of the items in the category i.e. all become selected, then all become deselected
- You can bulk add resources by selecting the check box in the a category header row
- Press save
- The event is now updated with the added resources
- Note this is how you remove resources from an event also

Resource categories
Resource categories are used to link the resource to one or more Crisisworks registers, so when you are searching to add an item, it will only filter on the items that are in the matching category.
- General - Used across : Request, Cases, Infrastructure Assessment Module
- General Equipment - Used across : Request, Cases, Infrastructure Assessment Module
- Fire Equipment
- Flood Equipment
- Relief Funding
- Fire Prevention Contractors - Used for Fire Prevention Module
- Infrastructure assessment Tasks - Used for the Infrastructure Assessment Module
- Recovery Services Tasks - Used in Recovery Cases (Services Required)
Exporting and reporting on resources
How to export your resource data
Run the resources report from reports section:
- Select “Reports" from the overview menu.
- After you select the “Resource Report” from the list of reports
- Press the green “Generate Report Button”
- Choose the Search parameters you want for the report
- Choose the field you want (Columns)
- Choose the Grouping (the field to group the data on)
- Choose the field to orderly (how it will be sorted)
- Press Run Report
- The resulting report can be exported as CSV or an an Excel file
Event resource usage and costs
- Goto the the event overview screen,
- (see "Adding resources into an event" to see the 5 ways to get to the event overview screen )
- Press the “Resources” tab on the left hand side
Importing resources
Importing resources will be added soon, it will be available in the same area that all other imports are done
- From the settings menu, select “Internals”
- From the left hand side select “Import Data”
- Under "What do you want to import?”, select resources
- Select your file
- Press import
- It is advisable to use the test option when using the feature for the first time, it will test your import data without adding the data
- See the page on importing for more details