Managing Users, Positions & Organisations
On this page
Overview
Crisisworks has been designed for multiple uses, each use or context needs different levels of access. The way this is managed is via positions. Only users that have at least one of the positions associated with an event will have access to the event, other users will not even know the event exists. This allows your organisation to use Crisisworks for many activities ranging from emergency management, event coordination, inspection, risk management, after hours call out system, business continuity, staff expense tracking and timesheets, rostering and many more. This provides your organisation with several uses for Crisisworks which helps keep staff's skills up to date with regular use and provide a greater return on investment.
In order to access and work within the event, users must be 103126728 that has been added to the event, plus they must go on duty. Users can be on duty for multiple positions in different events at the same time.
Understanding how users go on duty to events
When users login they will be presented with a Manage Duty Status screen. This is where a user can go on duty in one or more positions in one or more events at the same time. The mobile app is a little different —after logging in, a user selects just one event, and they then choose one position at a time for the event. Users can re-join the same event with an additional positions if needed.
Being on duty or not on duty does effect the level of functional access you have. For example if you are a recovery officer and an assistant coordinator you will be able to send announcements and assign requests. If you go off duty as the assistant coordinator and remain on duty as the recovery officer, you will not be able to perform these specific functions anymore.
If a user does not have a position that is associated with an event they will not see that event.
This images below shows the web and mobile duty screens.
| Going on duty from web | Going on duty from mobile |
|---|---|
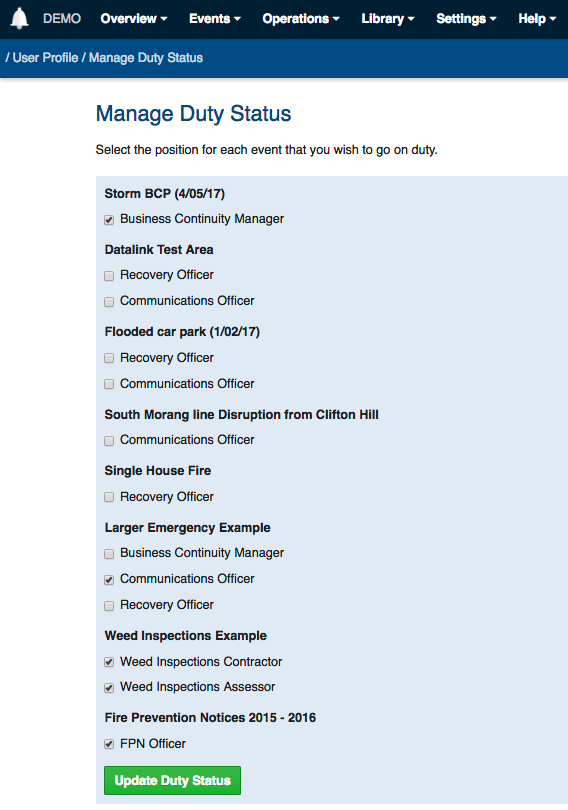 | 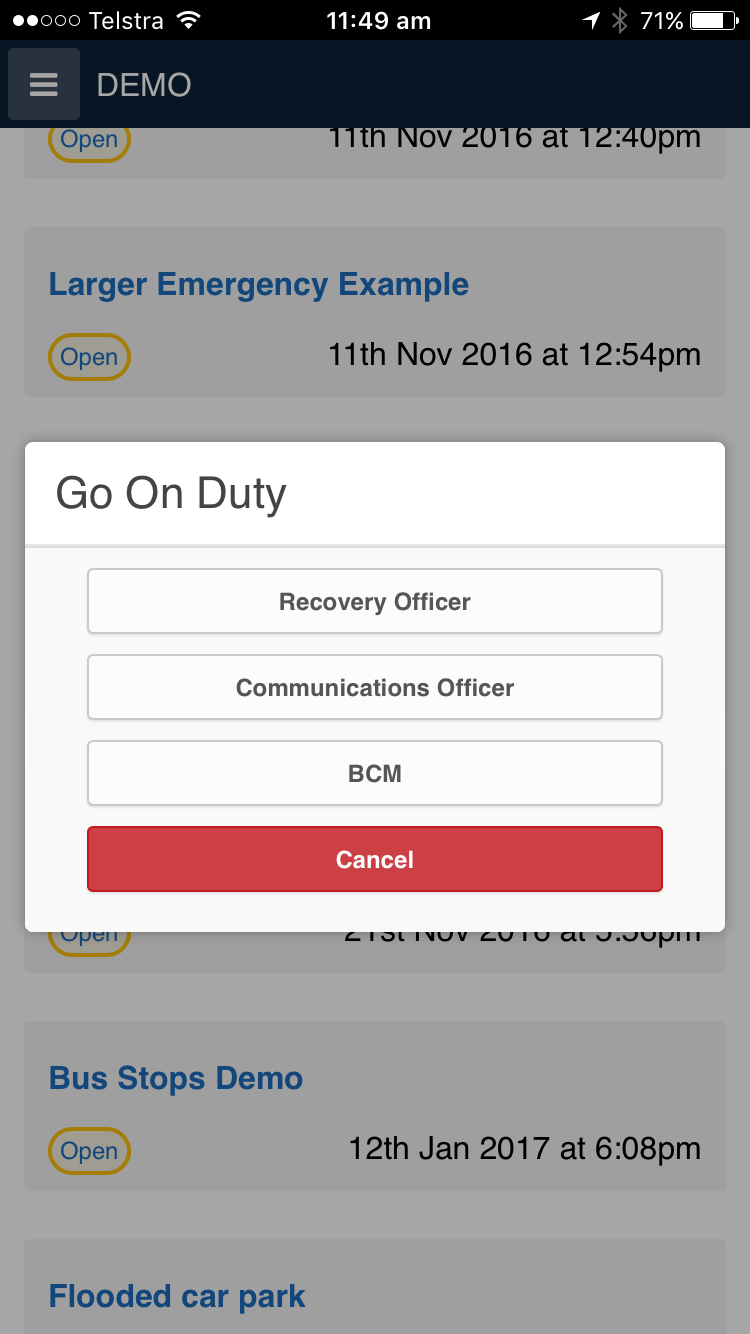 |
Managing users
Managing users, positions and levels of access before you need them in an emergency will facilitate a smooth operation at the time. Each user should have position(s) that will match their actual positions in the real world. These positions should be given the levels of access to enable them to achieve their roles.
As a User Administrator you will have the access required to edit user's accounts and to view and edit existing positions. Your Crisisworks installation has a number of default positions that you can rename or add additional security to. See the section below regarding managing positions.
A good way to test Crisisworks is to have a test account that you can use in a second web browser. You can change the position in this test account if you want to confirm or test it out. This is a good way to simulate user's access which will be less than yours. If you need to make changes you can switch to the first web browser, make the changes then test in the second web browser.
Creating a user account
User accounts are managed via Contact records.
As a Crisisworks administrator:
- Select Users from the Administration menu. This will direct you to the Contact data grid with a pre filtered list of active contacts who are also system users.
- Press New Contact from the top right-hand side corner of the contact data grid.
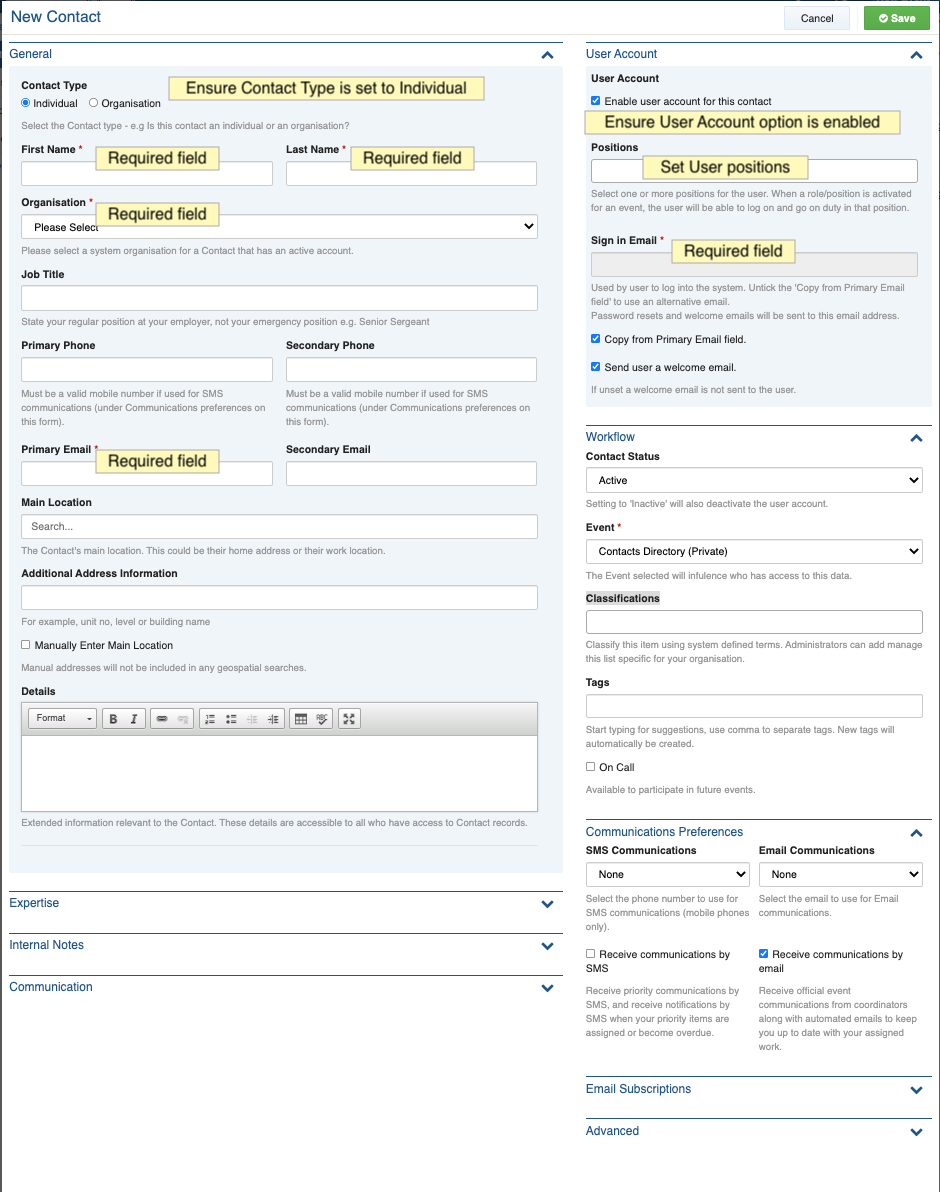
Ensure the Contact Type option is set to Individual and tick the option Enable user account for this contact in the User Account section at the top right of form and fill in the user's core details.
Every user account must have an email address, and it must be unique. This is used to log into the system, and is specified in the Sign in Email field.
The same email address cannot be shared between user accounts on the same Crisisworks site.
- Ensure as a minimum, the First Name and Last Name has been entered and Organisation has been selected.
- Ensure the Primary Email and Sign in Email are entered. If you wish to use a different email to sign in as set for the primary email, untick the option Copy from Primary Email field. This will enable you to change the email set in the Sign in Email field.
- Select all the Positions that the user should be granted access. This controls their access to events, as well as their security.
By default, all users are also added to the Contacts Directory (Private) event. This is to restrict access to the User Accounts to only those users with user positions set up for the event. By default User Administrator, Full Access Administrator and Communication Coordinator.
Enter any Tags and or Classifications you would like to add to the user, to assist with searching for them at a later stage.
Press Save.
The user is then created and an email is sent to their email address to help them log in.
If you do not want to send the user a welcome email - untick the option Send user a welcome email.
If you would like to make further edits to the user's profile, you can click contact record to view the newly-created user account, from which you can change the user's password, manage their duty status and edit their user profile.
Editing a user account
As a user administrator:
- Select Users from the Administration menu. This will direct you to the Contact data grid with a pre filtered list of active contacts who are also system users.
Find the contact you want to edit. To find a contact user you can use the tag or user counters, or perform a text search.
You can use the magnifying glass in the left hand side to filter the list. You can use wild cards like pet* to search for "Peter ", or "Fred Peterson" or filter by position/competency
- Select the contact user from the filter list by selecting the user ID or the name.
- You will then be taken to the contact in view mode.
Press the green Edit button at the top of the screen.
- Edit the necessary fields such as name, email, mobile
- The "Job Title" is a text field only that is used for each audited change. This is normally the person's role in the organisation or their primary Emergency management roles in the organisation.
- A user can be marked as On Call. If a user is "on call", coordinators can place them on duty in future events in their matching positions.
- Set one or more Classifications or Tags to help you manage how you can group the users for later retrieval.
- Add any expertise data that you may want to track in the Expertise section on the form.
- Update the Communication Preferences and set the SMS & Email Communications option where the user has multiple phone numbers or emails and how they would like to be notified either by email, SMS or both.
- Email Subscriptions manage the user's subscription to Crisisworks emails regarding upgrades, planned outages and information.
- To modify the user's position(s) see the next section below
- Press save
Assigning positions to users
As a user administrator:
- Select Users from the Administration menu. This will direct you to the Contact data grid with a pre filtered list of active contacts who are also system users.
- Find the contact you want to edit and click on the ID or the name.
- Select the Positions field by positioning your cursor inside the box. A list of the positions will appear.
- Scroll through the list to find the position you want to add then select it, or simply start typing and the list will be filtered based on the letters you have typed so far. You can also use your arrow keys to navigate the list. When you have found the position to add, select the position by clicking it or highlighting it and pressing Enter.
- As you add positions they will appear as seen in the image below
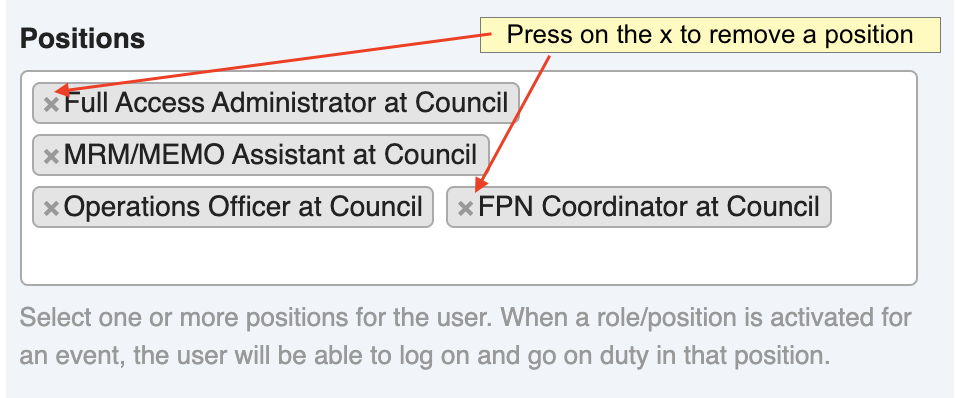
- To remove a position, press the X in front of the position as you can see in the image above.
Setting user's communication preferences
Users can set their own notification preferences or user administrators can set them on their behalf.
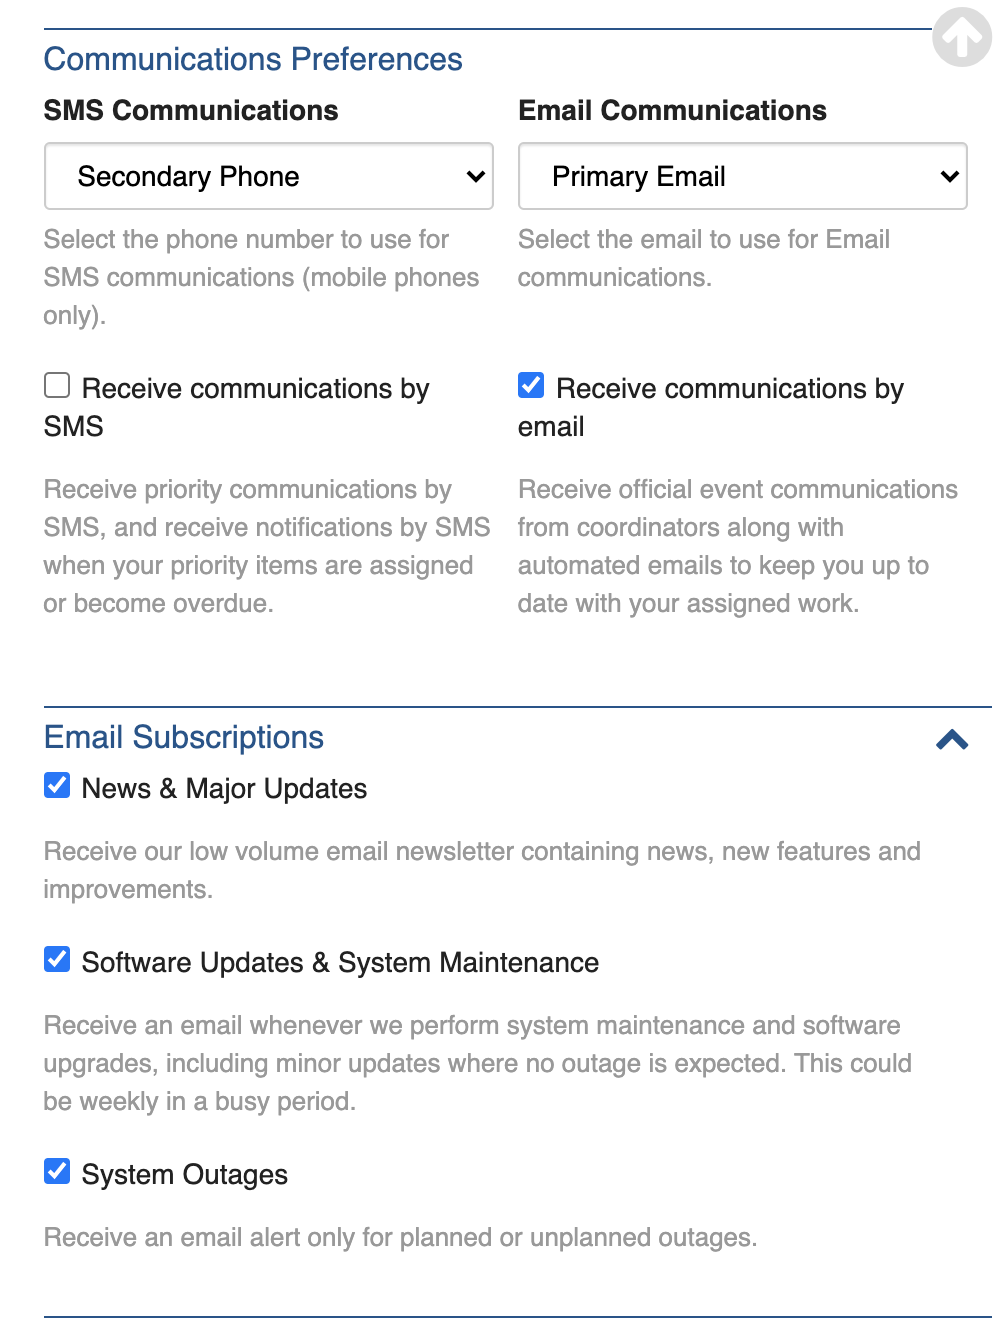
Communication Preferences
A contact user can have multiple phone numbers (Primary Phone and Secondary Phone) and email addresses (Primary Email and Secondary Email) and which of these to use when sending communications is set using the fields SMS Communications and Email Communications.
Whether or not the user receives email and SMS communications is controlled by the options Receive communications by SMS and Receive communications by Email.
Communications are sent either via a communication message or automated emails to alert users of key events, such as item assignment. A coordinator can bypass these user options when sending urgent communications.
Email subscriptions
Crisisworks has a low volume set of emails that keep users update, informed and trained in the product.
Deactivating a user
Deactivating a user will prevent them from being able to log into Crisisworks. This is especially recommended when a staff member changes their role or leaves the organisation.
To deactivate a user account but leave the contact record active:
- Select Users from the Administration menu. This will direct you to the Contact data grid with a pre filtered list of active contacts who are also system users.
Find the contact you want to edit and click on the ID or the name.
Untick the Enable user account for this contact checkbox and Save.
To deactivate a user account and the contact record:
- Select Users from the Administration menu. This will direct you to the Contact data grid with a pre filtered list of active contacts who are also system users.
Find the contact you want to edit and click on the ID or the name.
Set the Contact Status of the record to Inactive and Save. This is deactivate both the contact record and the user's access to the system.
Automated Account Deactivation
A security feature of Crisisworks is a scheduled daily process that run that deactivates inactive accounts that have not been used for more than 24 months.
A user will be sent a deactivation email notification 30 days prior to the 24 month period, asking them to log in an update their user profile details. Seven days prior to deactivation, if the user has not logged in, they are sent a final reminder. If the user does not log in, their account will become inactive on the 24 months. In the future, this period may be reduced for some or all sites.
Site ‘User Administrators’ will be sent a summary notification when users receive the 30-day warning, and again if the account is deactivated.
Managing Positions
You can edit and create positions to help you manage users and their levels of access. Most of the time you will create real-world positions and edit them to make sure they have the correct access.
To edit a position:
- Select Settings from the Administration menu. Click the Positions link on the left-hand side.
Find the position you want to edit. You can use the position group counters, or perform a text search to find a position.
You can use the magnifying glass located on the left-hand side to filter the list. You can use wildcards like bus* to search for "Business Continuity Manager ", or "Bus stop manager"- Select the position from the filtered list by selecting the ID or the position name
Press the Edit button
Some positions will not display an Edit button. This is because they are system positions that come out of the box with Crisisworks and cannot be changed.
- The next screen has some values to enter/edit
- The organisation (see below)
- The position Group (see below)
- The position name
- The short name (This will often an Acronym or well-known abbreviation in your organisation )
- Set the security policies for the position. This controls what level of access the position has.
- Select all of the security policies you wish to add
- This image below shows a list of security policies that are made by Datalink (additional ones can be created if needed). These security policies are the smaller building blocks of access that you can build up into your own custom positions
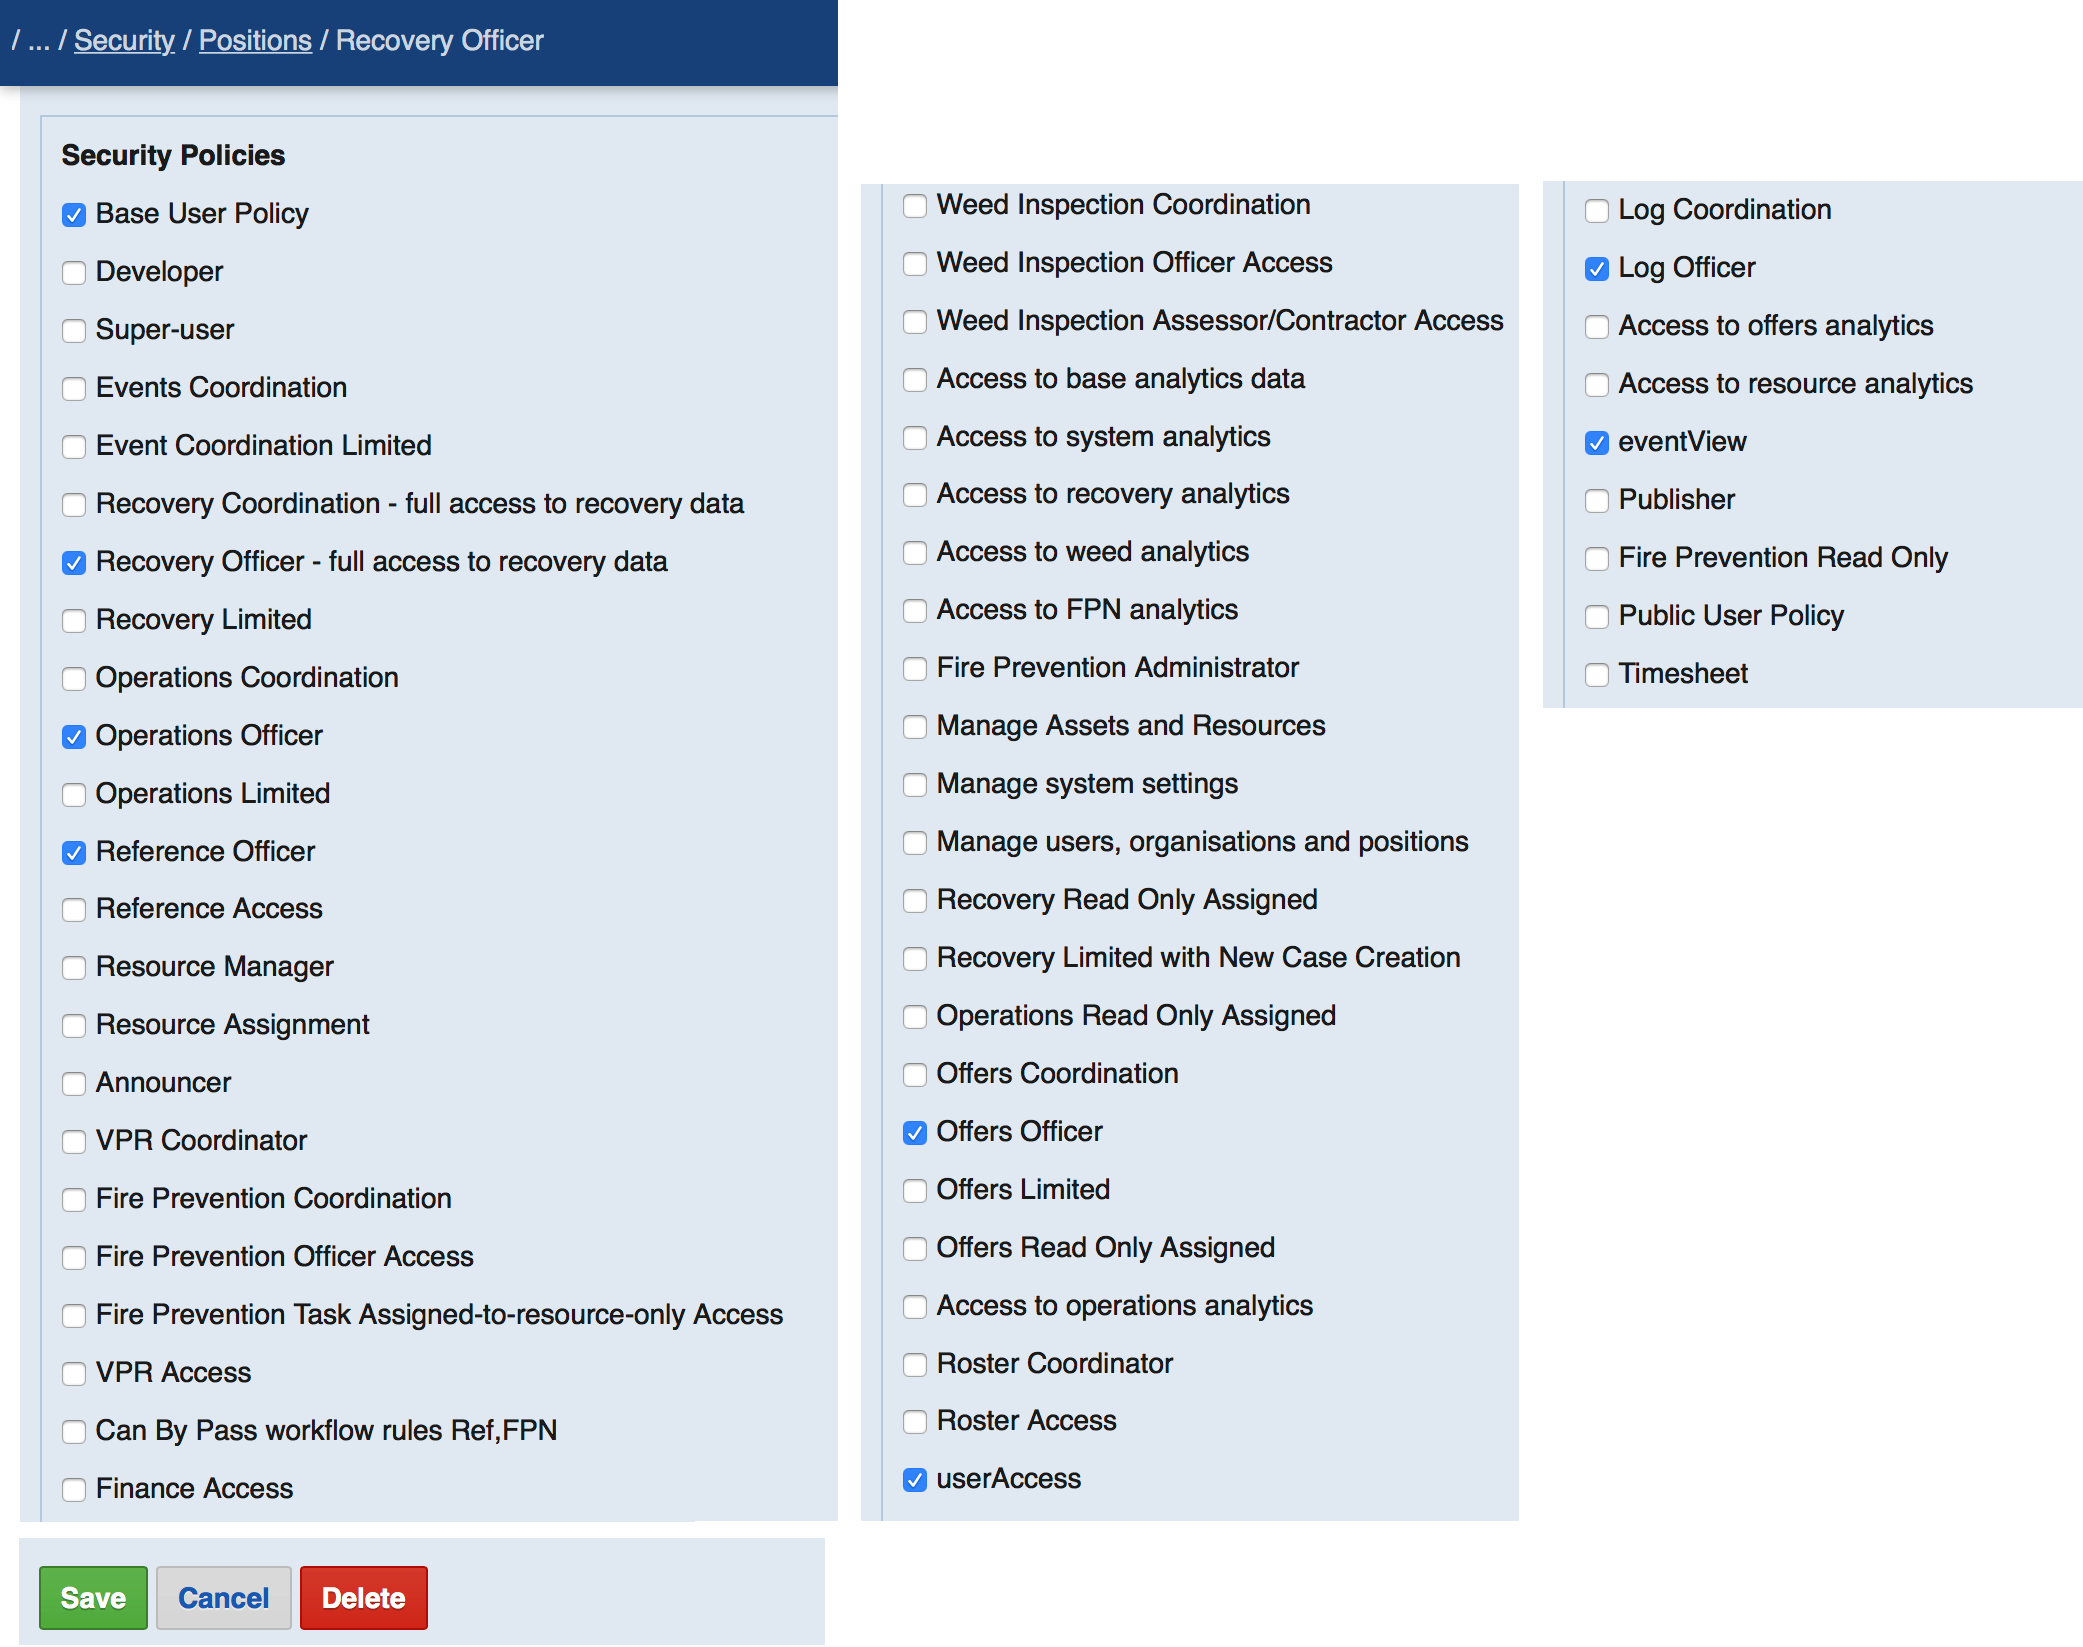
- If you are editing a system record (as indicated in the image below in the View a Positions access and usage section) all additions to the position will remain, but any policies you remove may be re-applied in the future when updates are applied. If you need to remove security policies from the default system position, we recommend creating a new position.
- Most of the security policy names indicate what they will do, however here are a couple of tips to help understand them:
- Coordination - maximum access, usually means you can edit any record, view all and can assign
- Officer - you can see all, but only edit records assigned to you or your position
- Limited - you can only view the details of records assigned to you and edit what is assigned to you or what you have created.
- Publisher - can publish information records to be sent as SMS and email
- Announcer - announce and promote items onto the top RHS corner of the dashboard
- Reference - refers to reference "Library". Reference used to be the previous name before it was changed to Library.
- Analytics - gives access to the group of reports accessible via the overview menu
- Can bypass workflow rules - has the ability to change any records status to anything you like regardless of the workflow set. We recommend that you have an extra position with this policy combined with the other register coordination. When this option is needed, you can go on duty temporarily in this position when you need to use it, then go off duty after you have used it. Very few people should have this extra position.
- If you see weeds or FPN policies but you don't have the modules licence, ignore them. Enabling them will not do anything for you.
- A more detailed description for the built-in security policies can be found on the Built-in Security Policies page.
For Victorian Councils, this page shows a list of all positions and what their access level is can be found on the Built-in Positions for Local Government users page.
Creating a new position
The concepts of editing a position and creating a new position are very similar with regard to the access privileges, however there are a few important additional steps to complete before you can use your new position(s).
Where to Create a new position
As a user administrator:
- Select Settings from the Administration menu
- Select the Positions link on the left-hand side
- Press the "New Position" button
Base User Policy
If you want users to be able to log-into Crisisworks they must have "Base User Policy" to allow them to log in. You can create virtual positions or distribution groups, where users will not log into Crisisworks, but still want to receive communications.
Add new position(s) to events
After you have created a position in Crisisworks, it is ready for use however is not linked to any events or global events (workspaces) or any users, so it wont do anything for you in your current event(s)
If you have workspaces like "Global Works Space" or "Council Workspace" you will need to edit those events to add the position(s).
If you have event templates like "Emergency sample" you will need to edit the template event to add the new position(s), this means any new events you create from the templates will copy new positions into new events along with the other positions and items from the event template.
If you want the new position to be used in any active events, you need to edit the event and add the new position(s)
Go off duty and sign out.
When user's re-join an event they will then have the level of access granted, however they will not have access to the global events. For them to see the data in a global event based on the new position they will need to "Go off duty and sign out" then sign in again.
Using Policy JSON data
To help administrators to manage the creation of lots of positions, Crisisworks supports Policy JSON, which is an advanced feature that allows a technical JSON document to be uploaded to configure the position to save administrators checking the numerous policy checkboxes.
To access an existing position's Policy JSON data
You can obtain the underlying Policy JSON for a position by viewing the position and clicking the following button.
Policy JSON data looks like this:
{
    "policies": [
        "Mecc_Bootstrap_Base::baseUserPolicy",
        "Recovery_Bootstrap_Relief::recoveryReliefOfficerAccess"
    ]
}
To apply Policy JSON data to a position
When creating or updating a position, at the bottom of the form you can paste in Policy JSON data.
When you save the form, this JSON data will be applied in addition to the policy selections made above, so the result will be a position having both the selected policies from the checkboxes and those defined in the Policy JSON.
Important: do not use a product that converts straight quotes into smart quotes, such as Microsoft Word. JSON is a standard format that requires straight quotes.
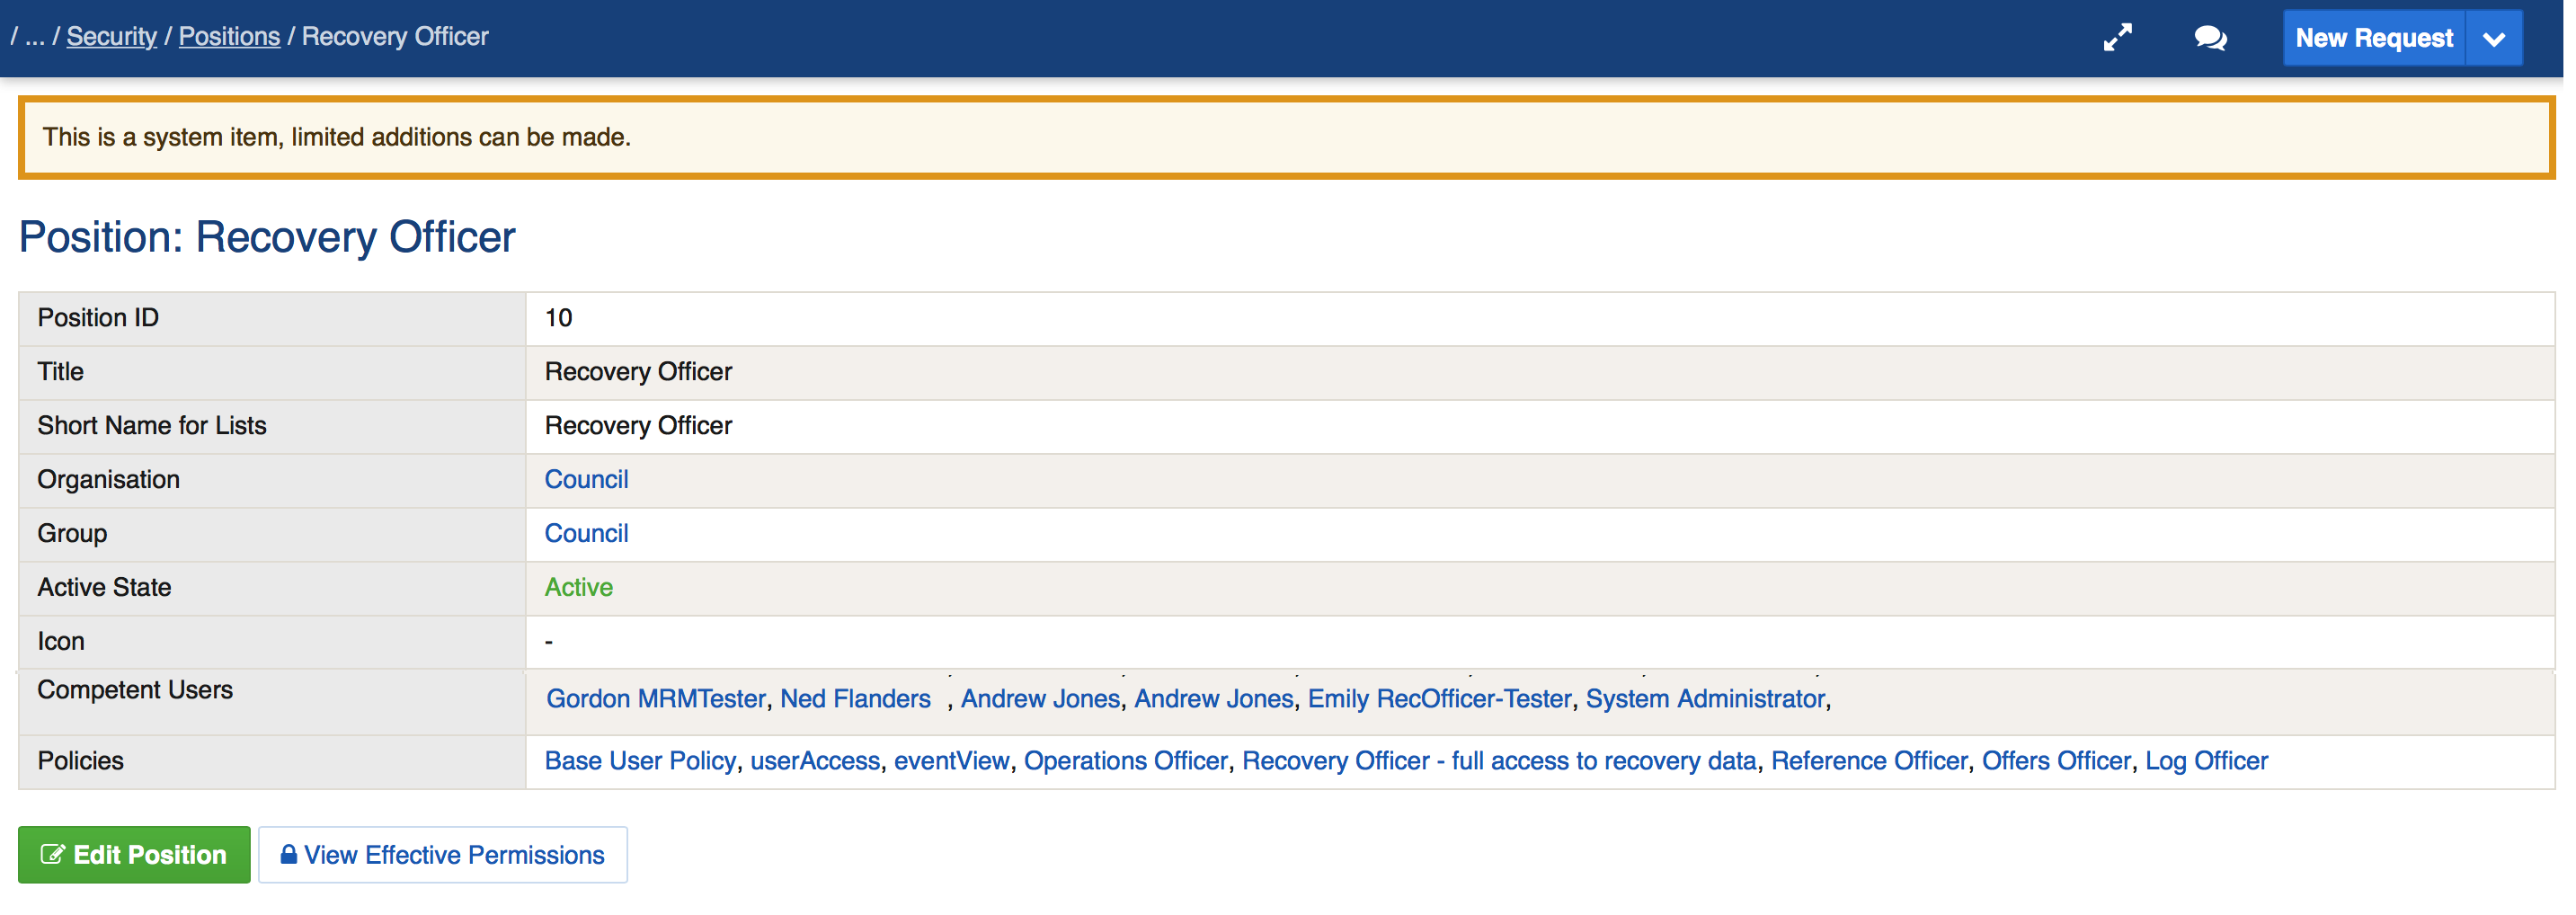
Viewing a position's access and usage
To see what a position can do and what a position has access to:
- Find the position (follow the same first three steps above in Managing Positions)
- This screen shows you which users have this position and which position group it belongs to.
- Press the "View Effective permissions" button. This will show you what the position can do and see.
Managing Position Groups
Position groups help you organise your positions, this helps in several areas in Crisisworks:
- When assigning, the positions are separated into the position groups
- On the requests datagrid the positions are separated by position group
- When editing an event you can bulk add or remove positions in the same position group.
You may decide to create position groups based on Physical areas or based on business units or a mixture of both such as North West Division, Executives etc
You can select Position Groups from the Administration menu to manage position groups.
Managing Organisations
Organisation can be used in Crisisworks to group positions or resources which assists with management.
Setting the correct organisation for resources can also be used to effect a record's access and to allow user accounts that have the same organisation as the resource to see and edit the record. This is helpful when working with subcontractors that will log into Crisisworks to edit their own records.
Organisations are a type of contact. You can create and edit organisations by selecting Organisations in the Administration menu.
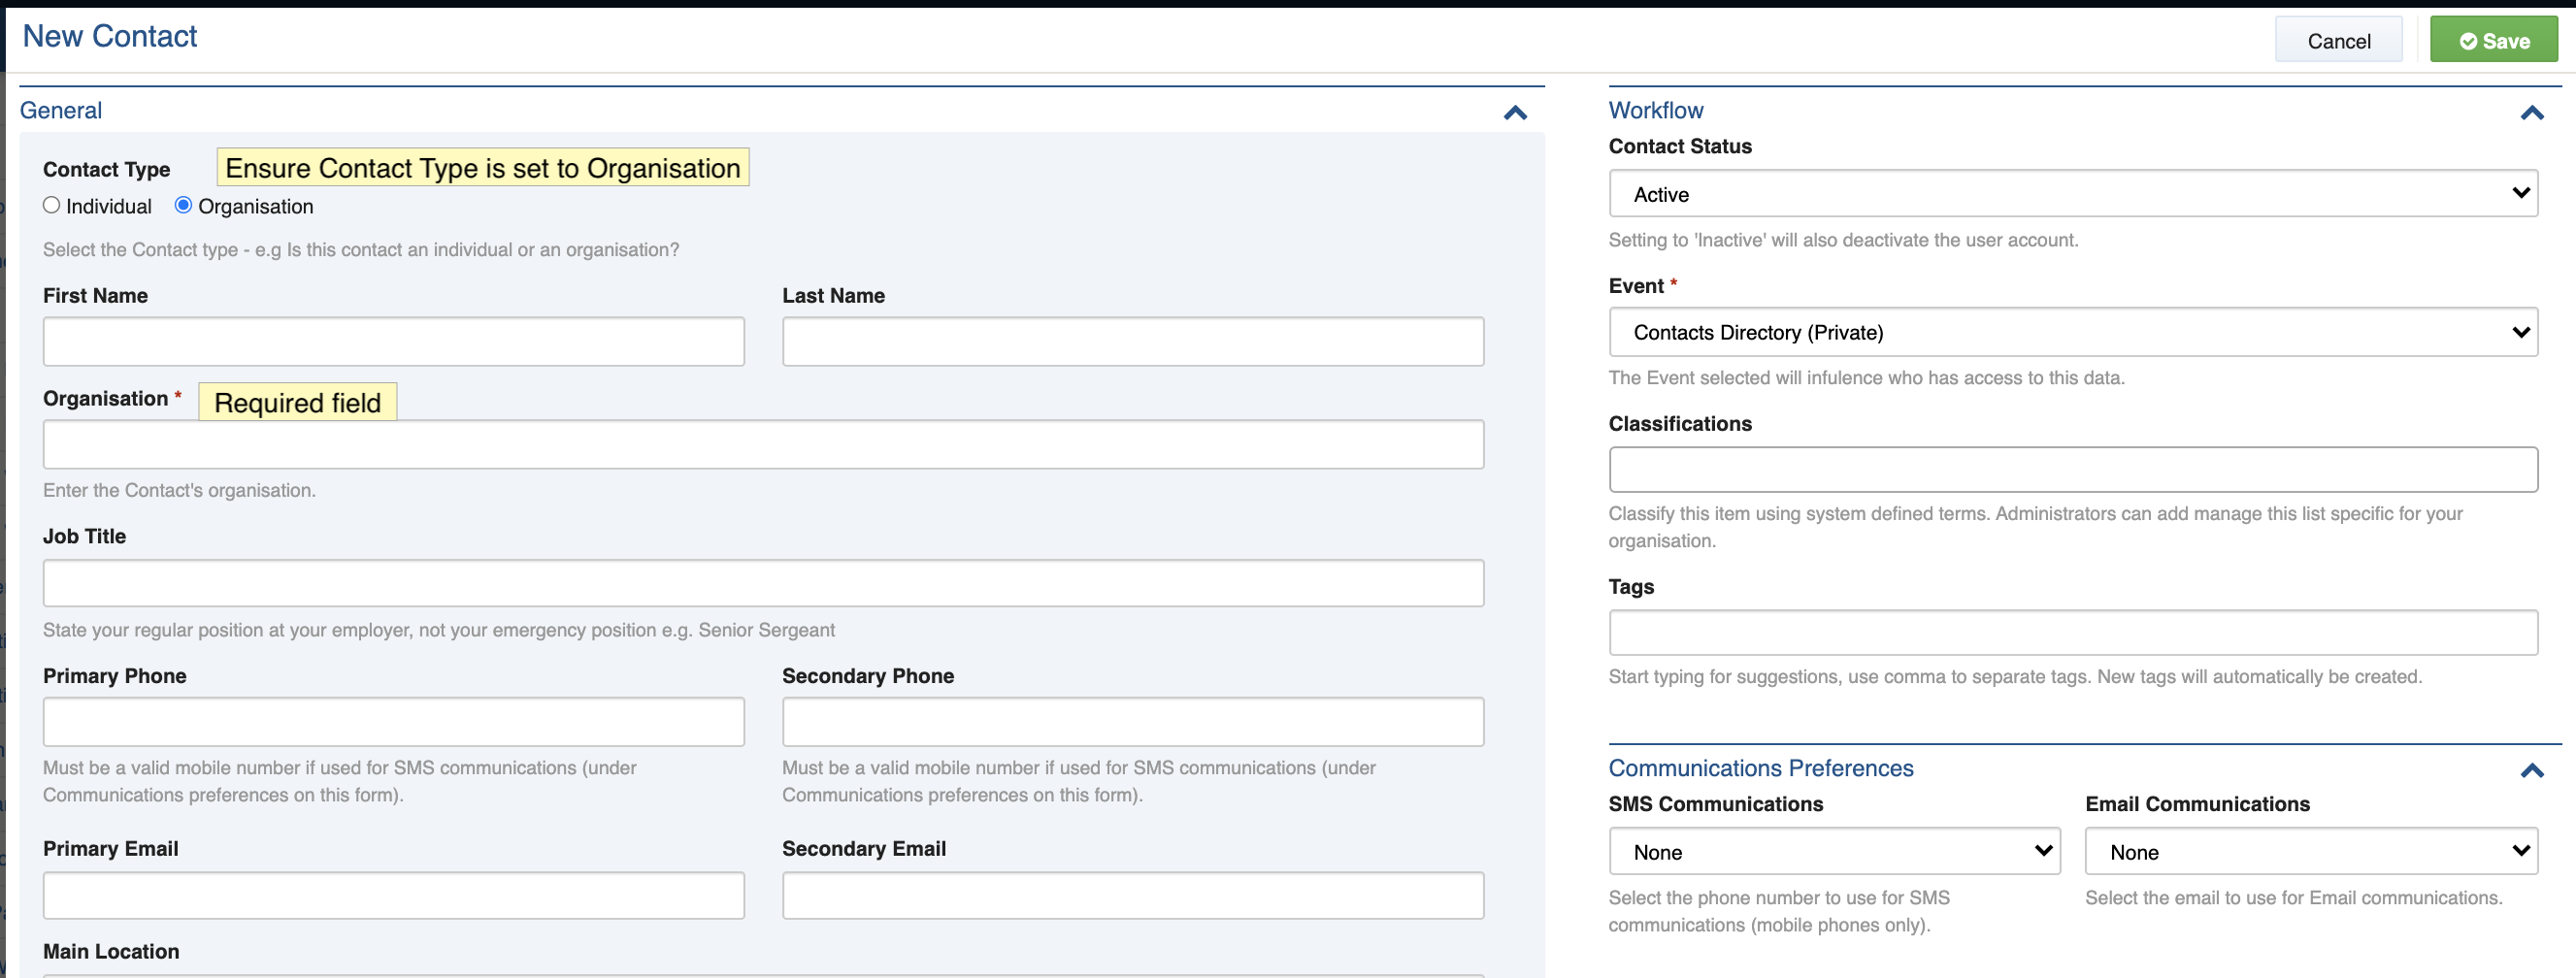
Creating an Organisation
As a Crisisworks administrator:
- Select Organisations from the Administration menu. This will direct you to the Contact data grid with a pre filtered list of active contacts who are also organisations.
- Press New Contact from the top right-hand side corner of the contact data grid.
Ensure the Contact Type option is set to Organisation.
- Ensure as a minimum, that the Organisation name is entered.
Press Save.
Editing an Organisation
As a Crisisworks administrator:
- Select Organisations from the Administration menu. This will direct you to the Contact data grid with a pre filtered list of active contacts who are also organisations.
- Press New Contact from the top right-hand side corner of the contact data grid.
- Select the contact organisation from the filter list by selecting the user ID or the name.
- You will then be taken to the contact in view mode.
Press the green Edit button at the top of the screen.
- Edit the necessary fields.
Press Save.